Last week, I talked about just what stress actually is. This week, you're going to learn about what stress does to our muscles, tendons, joints, and nerves. I'll list the three most common painful conditions that are caused by stress and provide some information on what you can do about it if you're suffering with those conditions.
First, there's a little bit of background you need to have. Many of us have probably heard about our fight, flight, freeze system. Our nervous system is broken down into three categories.
The autonomic nervous system is the part that is most affected by stress. This system is broken down into two parts, the sympathetic nervous system and the parasympathetic nervous system.
The sympathetic nervous system is what is normally referred to as our fight or flight system and the parasympathetic nervous system is often referred to as the rest and digest system.
The sympathetic and parasympathetic systems are both always online in your body. However, if you're walking through the woods and a bear jumps out and starts chasing you, your parasympathetic nervous system will dial way down in function, and your sympathetic nervous system will turn way up. The sympathetic nervous system is meant to protect us from danger. However that system is meant to only be on full blast for short periods of time.

Normally, if that bear jumps out in the woods, the sympathetic nervous system shoots up to overdrive, pumps more blood to your muscles so you can run faster, and usually within 5 to 10 minutes - it's over, one way or the other. You either got away from the bear or you didn't, but either way, the system then is meant to go back to normal.
But we sit in traffic stressed to the max for hours at a time.
And during that time our sympathetic nervous system is running continuously.
That's where the problems occur.
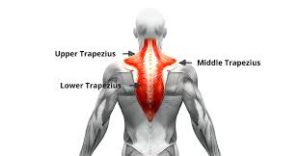
Our bodies can function pretty well with increased activation to those muscles for a short period of time. But if it continues day after day in our stressful lives, then it starts to cause problems. It starts to cause pain and tension on both sides of the neck, it can cause shoulder problems due to the fact that this raises the shoulder from its normal resting position and makes it more vulnerable, and it can cause pain in between the shoulder blades from the tension of all those muscles.
2. The second most common musculoskeletal consequence of increased stress is pain in the jaw. It is very common that when people are under stress, they will clench their jaw as a compensatory strategy. This constant tension can create pain in the muscles surrounding the jaw as well as pain in the jaw joint itself.
But clenching the jaw is not only a problem for the jaw itself. The way that the muscles in our head and neck work, when you clench your jaw, you clench your neck. So not only does teeth/jaw clenching lead to pain in the jaw, but it can also lead to neck pain as well as headaches. The type of headaches that it causes are referred to as tension headaches. These headaches are felt at the base of your skull and around the sides of your head.

3. The third most common musculoskeletal issue caused by stress is low back pain. The jaw is not the only area that people clench when they are stressed. There are two other areas that are very common for people to clench during times of stress. These are the abdominal muscles and the gluteal muscles.
Excessive clenching in either of those two areas is known to lead to low back pain. There is a phenomenon in the body called irradiation. This phenomenon basically means that tension breeds tension. An example of this is if you were trying to lift something heavy with your right arm, and it was difficult, you might clench your left fist really tightly in order to build more strength in your right arm. So basically, creating tension in a nearby area increases the tension in that secondary area.
Increased tension in the abdominal muscles leads to increased tension in the low back muscles which will lead to pain. The same thing happens in the gluteal muscles. Our muscles are meant to work all together. When one group becomes dominant and overactive, this causes tension to increase all around that area.
If you're reading this and you are thinking that you can really relate to those three areas that I talked about above, you're probably wondering, "Well, what can I do about it.?"
There are two main things that need to be done for these problems to improve. The first is: you need to develop strategies for managing stress.
None of us can avoid stress. It's just a part of life. However, that doesn't mean that we just say woe is me and do nothing. So that means, if certain times of our life become more stressful than normal, we'll want to find strategies to mitigate the stress. I will talk about some specially helpful strategies in further blogs.
In conjunction with managing your stress, you want to find ways to alleviate the tension in the areas that are bothering you. Below, I will go over great ways to reduce the tension in the three areas I talked about above.
The contract-relax stretch is shown below. This type of stretch involves activating the muscle first and then stretching it. After a muscle has been activated, it's actually more susceptible to stretch.
2. For the inner shoulder blade muscles, I recommend using a lacrosse ball or trigger point ball.
a) For this, you're just going to go stand with your back against a wall. b) Put a lacrosse ball in between your shoulder blade and your spine. c) Then you're just going to move your torso and bend your knees in order to roll the ball all the way into the muscles in between the shoulder blades.
I recommend 60 to 90 seconds on each side of the spine.
For the jaw muscles, there are two main areas that need to be worked on. These are the jaw muscles, and the upper neck muscles. As I said before, clenching can cause both jaw pain and headaches that tend to be at the base of the skull.
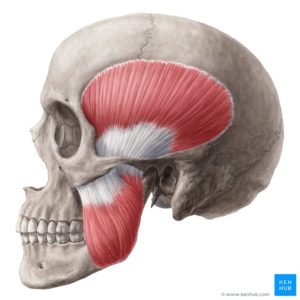
a) The first technique is a release of the tension in your jaw muscles. For this one you're going to take your fingers and find your cheekbones and follow your cheekbones back towards your ear. There are two main groups of job muscles that we want to release. One of them is above the cheekbones and the other one is below.
b) So first, we'll start on the ones above the cheekbones and you'll just move your fingers upwards into the area just in front of your ear. You're going to push your hands inwards like you're trying to go into your skull and then kind of drag the tissue up towards the ceiling. This pins the muscle. Then you're going to slowly open your jaw as wide as you can: this will stretch the muscle. The video below shows the release for the muscle that is above your cheekbones. You would just repeat the same technique in the muscles below your cheekbones.
The image below shows the locations of these muscles so you'll want to do multiple passes with your hands since the muscles are pretty large.
3. The last area are the muscles at the base of your skull. These are the muscles most commonly affected when we clench our teeth. And these are the muscles most commonly associated with tension type headaches.
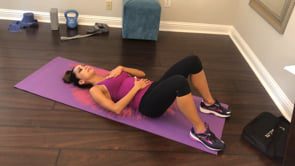
a) To work on these muscles, you're going to want to get either two tennis balls or two lacrosse balls and you're going to tape them together like the photo below. We call this device a peanut. b) What you want to do is to find a semi-hard surface and lie down on your back. c) Take the peanut and place it just below the base of the skull. d) You don't want the balls actually pushing on the bone of the skull - you want them in the fleshy area just below.
I recommend starting off by lying on this for 4 minutes at a time. Every couple of days, increase that by a minute until you get to 8 minutes. I don't recommend lying on it for longer than 8 minutes.
For the tightness that comes from gluteal muscle tension, we want to stretch out our hip muscles. The video below shows one of the best stretches to relieve tension in these areas.
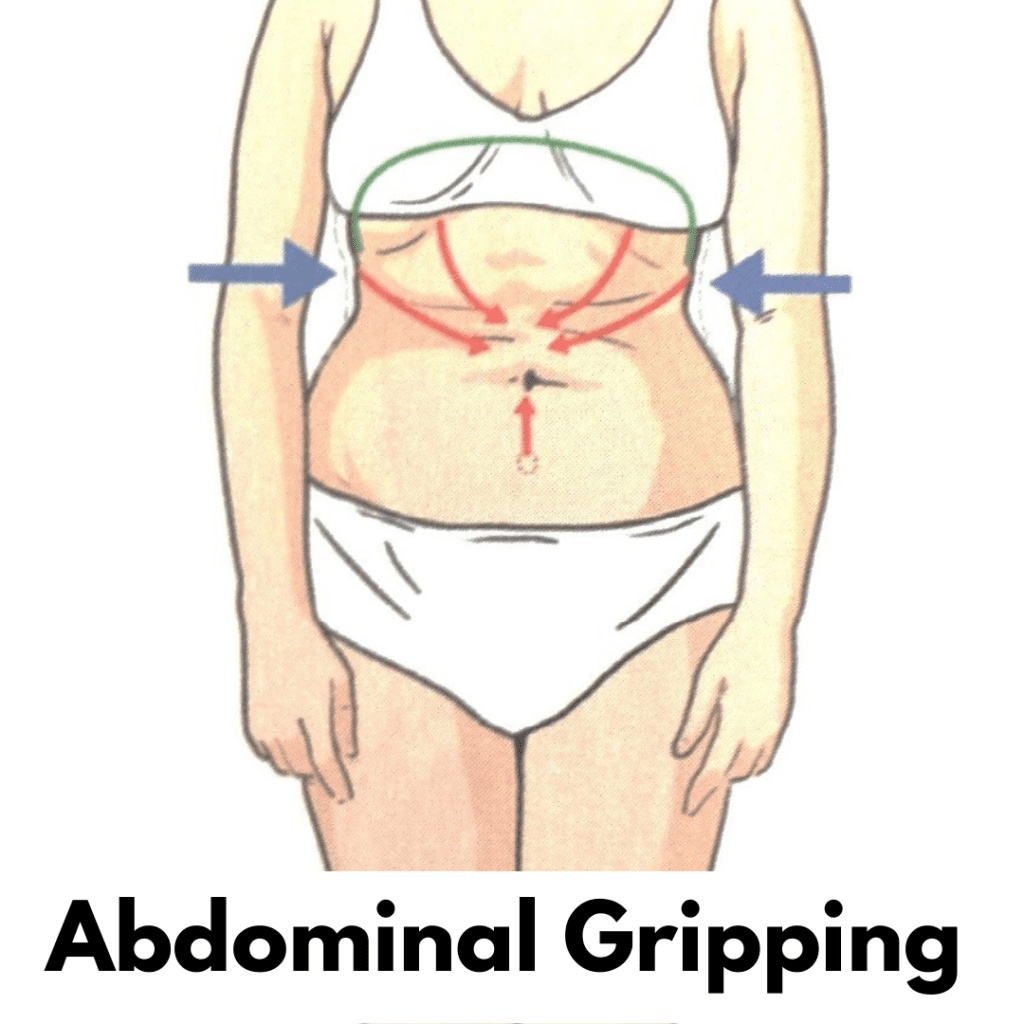
If you are an abdominal gripper and notice tension in your abs daily ,the technique shown in the video below can be extremely helpful. He uses a much larger ball, but I recommend using a lacrosse ball in the same fashion as he shows in the video.
So there you have it. That darn stress really takes a toll on our body! But now you have some tools to fight back. Try these out and stay tuned for next week when I'll talk about stress management strategies.
And if you're dealing with a lot of pain right now and don't have time to wait for some of this stuff to work on your own, be sure to give us a call at 918-300-4084 and we can help you speed up that process of getting out of pain!

In today's world, we've pretty much learned that a functional core is vital to how our body performs. Many of the aches and pains that are common can be linked to an improperly functioning core. But what you may not know is that proper posture is a big player in how well your core functions.
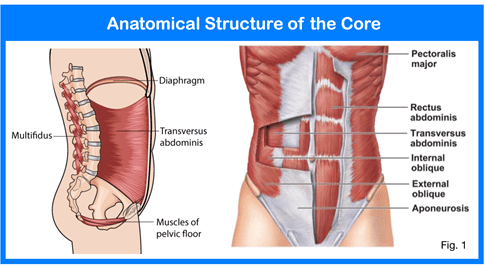
Our core is functionally a cylinder. It has cylindrical walls and a roof and a floor. The walls of our core are the deep abdominal muscles in the front and sides and our spinal muscles in the back. The roof of the core is our diaphragm. The floor of the core is our pelvic floor muscles. The picture above illustrates this.
In order for the core to function properly, the walls, roof, and floor must all be aligned properly. The purpose of our core is to do two things: Our core attaches the top part of our body to the lower part, and it creates something called intra-abdominal pressure.
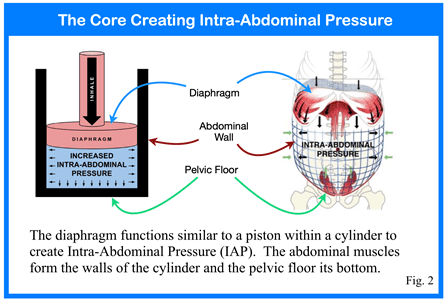
Intra-abdominal pressure is vital for proper core function. To picture what intra-abdominal pressure does, you need to imagine blowing up a balloon as much as you possibly can. Then imagine grabbing the balloon from the top and the bottom and trying to twist it or fold it over on itself.
If it's completely full of air, this will be difficult. But imagine you let a little bit of air out. Now it's easier to twist and bend that balloon.
The same concept applies to the core. When we have good intra-abdominal pressure, it helps to stabilize our spine and make it hard to bend and twist. This is important when we're lifting heavy things to help keep our spine safe. When we don't create intra-abdominal pressure well, our spine is vulnerable.
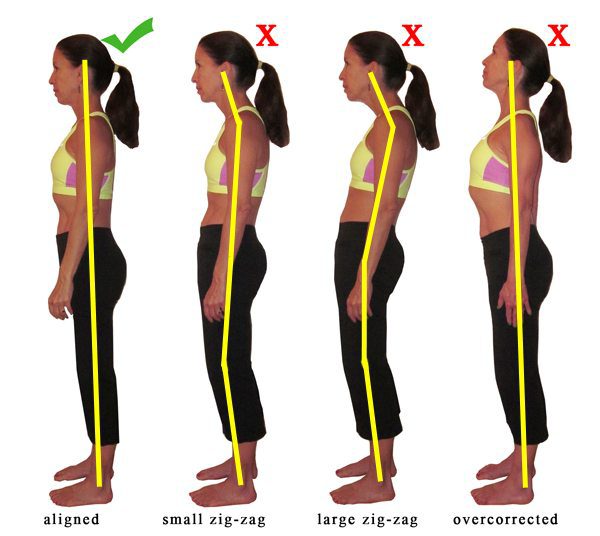
The roof has to be stacked directly over the floor. In regards to posture, this means that your diaphragm needs to be stacked directly over your pelvic floor. Your diaphragm is attached to your rib cage and your pelvic floor is attached to your pelvis. So, if your rib cage or pelvic posture is not ideal, then you are at a disadvantage for creating intra-abdominal pressure.
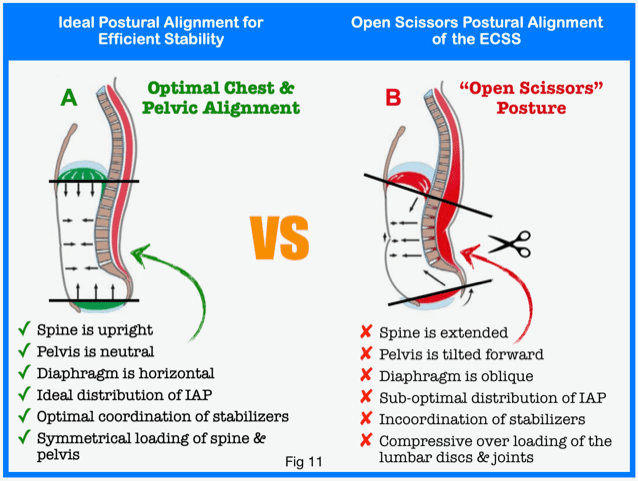
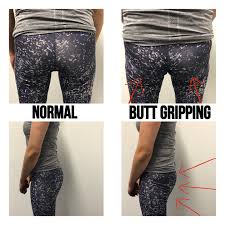
Many people have what's referred to as "open-scissors posture." This is when we have a little bit of an excessive arch in our low back that causes our rib cage to be tilted backwards and our pelvis to be tilted forwards. This creates really bad alignment and hinders the creation of intra-abdominal pressure. The picture above shows the open-scissors posture.
The video below shows the proper postural alignment and how to put your body in the best position to enable your core to function.
The exercises below are great to help make those postural corrections permanent. Remember to start these exercises with proper alignment.
It's easy to see how your Posture affects your Core!
And there you have it. Now you have some great tips for how to align your body to get better core function. If you are reading this blog because you have pain related to poor core function, we can help! Just come see us at Movement Laboratory to experience the MovLab Difference!
Using Chiropractic care and specific therapeutic exercises, we get people out of pain and back to what they love FAST! Call us at 918-300-4084 to schedule your appointment today.


I often have patients who come to see me for neck pain. I will do some manual therapy on their neck muscles and adjust some of the joints in their neck -- and they walk out feeling amazing! Then I'll see them a few days later -- and their neck has tightened back up again.
Patients often ask me, "Why is my neck always tight?" I tell them that one of the major contributors to chronic neck pain and tightness is poor breathing mechanics. At this point, they normally look at me like I have two heads. They may say, "Well, I'm alive -- so how can I be breathing wrong?"
In this blog, I'm going to cover how poor breathing mechanics contribute to neck pain and what to do to fix it. (add in a separator line here to note the Blog beginning)
The Body's Ability to Adapt - Good AND Bad
Our bodies are pretty amazing. One thing that makes our body so amazing is its ability to adapt. Without this ability, when we sprained our ankles, we would be confined to a wheelchair. Instead--our body figures out a way to walk without putting weight on our injured ankle - what we would call a limp.
But sometimes this ability to adapt can lead to problems. Imagine if you sprained your ankle when you were 12 -- and your body decided to limp for the rest of your life. Eventually, the changes your body made to not put weight on your injured ankle would start to overload the other areas of your body and possibly lead to pain and injury.
The same thing can happen when we change our breathing mechanics. The primary muscle that's supposed to be used for breathing is the diaphragm. The diaphragm sits at the bottom of our rib cage and is shaped like an upside-down bowl. When the diaphragm contracts, it drops down and creates negative pressure in the chest. That makes us suck air in through our mouth and nose and fills our lungs with precious oxygen.
Even though the diaphragm is our body's primary muscle for breathing, we also have lots of other muscles that are called secondary (or accessory) muscles of breathing. These muscles are supposed to be called upon only in times of great oxygen demand. After vigorous exercise, these secondary muscles help to increase the amount of oxygen coming into the lungs to help us recover from the exertion.
Problems occur when people start to use these secondary muscles of breathing all the time. These muscles are only designed to assist in breathing occasionally, and are not to be used 24/7 while we breathe in and out all day long. These muscles are much smaller than the diaphragm and can fatigue much more easily than the diaphragm.
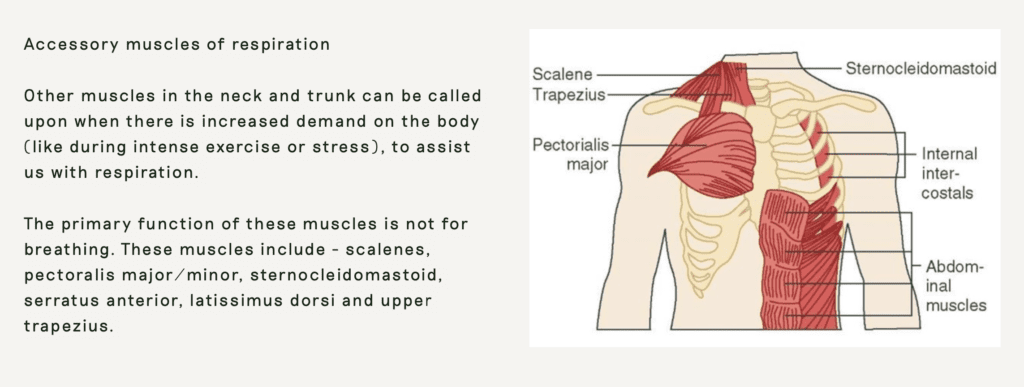
If you look at the picture above, you'll see that it shows these secondary muscles of breathing. Many of them are around our chest and neck. Breathing mechanics that overuse these muscles can lead to tightness and soreness in these areas. The average human breathes 20,000 times a day. So if you use these muscles to breathe all the time, they get a 20,000 rep workout every day. Imagine what your biceps would feel like if you did 20,000 bicep curls every day! They'd probably be pretty sore and tight.
When we primarily use our secondary muscles of breathing, that's called a chest-breathing pattern. Instead of using the diaphragm to drop down and create negative pressure in the chest, we elevate our rib cage to create that negative pressure in the chest. This pattern not only leads to the tightness that I was talking about; it is also a less-efficient breathing pattern that leads to less oxygen entering our lungs.
Why do Most of us Breathe from our Chest, Not our Diaphragm?
So why does this happen in the first place? There are a lot of answers for this.
For many of us, one big reason is simply our culture. When we breathe with our diaphragm, the diaphragm drops down and creates that negative pressure in the lungs -- but what it also does is that it increases the pressure in our belly -- which makes our belly expand.
If you think of every article you've ever read about losing weight, how to dress attractively, or every depiction of an attractive person in our media, you'll be quickly able to note that an expanded belly is never a part of any of those messages about how to look great. From a very young age, we have modeled for us that we must always suck in our bellies -- to appear skinny. This is a very strong cultural message, and in my opinion, is one of the primary underlying reasons for these chest-breathing strategies.
What can we do to change this Breathing Pattern and Start Using our Diaphragm to Breathe?
So now that we know what the problem is, how do we fix it?
FIND Your Diaphragm
The first thing we have to do is get in touch with our diaphragm muscle. Let me give you a great exercise that will help you do just that.
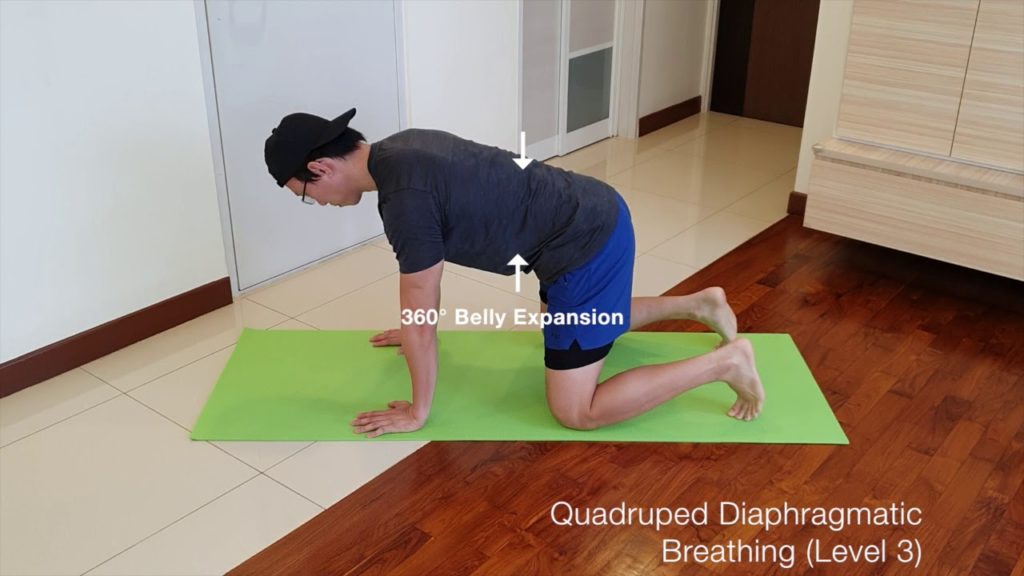
After learning how to feel your diaphragm, you want to go right into learning how to use it to breathe.
Use Your Diaphragm to BREATHE
Lying on your back is the easiest position to use as you first start to practice proper breathing mechanics; that's because it allows most of your muscles to relax since you're not having to resist gravity. But that's not usually a position that we're in much of our day -- so it's important that we also learn to do this same type of breathing in other positions.
If you take the time to work on each of these exercises for two to three weeks, and then move on to the next one listed, I promise you that you'll begin to notice less tension in your neck and chest.
Why not spend 3-10 minutes a day doing this Breathwork to give your neck and chest muscles a new possibility of Relaxing while your diaphragm does the work it was designed to do? You won't regret it!
If you need more help with your neck pain or any other pain, Movement Laboratory is here to help! Give us a call at 918-300-4084 and schedule your appointment today. During the month of November, we are having a special for a free exam on your New Patient visit. That's an $85 value! Don't let pain interfere with your Holidays, come see us today!
This class is a collaboration between Dr. John Keefe from MovLab and Zac King from Anthroproach. In this class you will learn how to identify the restricted areas in your body and be given easy to use tools to fix these problem areas. This class is great for people dealing with pain or people just wanting to learn how to better take care of their bodies.