Last week, I talked about just what stress actually is. This week, you're going to learn about what stress does to our muscles, tendons, joints, and nerves. I'll list the three most common painful conditions that are caused by stress and provide some information on what you can do about it if you're suffering with those conditions.
First, there's a little bit of background you need to have. Many of us have probably heard about our fight, flight, freeze system. Our nervous system is broken down into three categories.
The autonomic nervous system is the part that is most affected by stress. This system is broken down into two parts, the sympathetic nervous system and the parasympathetic nervous system.
The sympathetic nervous system is what is normally referred to as our fight or flight system and the parasympathetic nervous system is often referred to as the rest and digest system.
The sympathetic and parasympathetic systems are both always online in your body. However, if you're walking through the woods and a bear jumps out and starts chasing you, your parasympathetic nervous system will dial way down in function, and your sympathetic nervous system will turn way up. The sympathetic nervous system is meant to protect us from danger. However that system is meant to only be on full blast for short periods of time.

Normally, if that bear jumps out in the woods, the sympathetic nervous system shoots up to overdrive, pumps more blood to your muscles so you can run faster, and usually within 5 to 10 minutes - it's over, one way or the other. You either got away from the bear or you didn't, but either way, the system then is meant to go back to normal.
But we sit in traffic stressed to the max for hours at a time.
And during that time our sympathetic nervous system is running continuously.
That's where the problems occur.
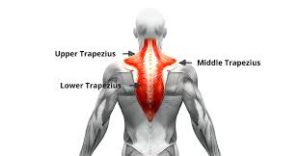
Our bodies can function pretty well with increased activation to those muscles for a short period of time. But if it continues day after day in our stressful lives, then it starts to cause problems. It starts to cause pain and tension on both sides of the neck, it can cause shoulder problems due to the fact that this raises the shoulder from its normal resting position and makes it more vulnerable, and it can cause pain in between the shoulder blades from the tension of all those muscles.
2. The second most common musculoskeletal consequence of increased stress is pain in the jaw. It is very common that when people are under stress, they will clench their jaw as a compensatory strategy. This constant tension can create pain in the muscles surrounding the jaw as well as pain in the jaw joint itself.
But clenching the jaw is not only a problem for the jaw itself. The way that the muscles in our head and neck work, when you clench your jaw, you clench your neck. So not only does teeth/jaw clenching lead to pain in the jaw, but it can also lead to neck pain as well as headaches. The type of headaches that it causes are referred to as tension headaches. These headaches are felt at the base of your skull and around the sides of your head.

3. The third most common musculoskeletal issue caused by stress is low back pain. The jaw is not the only area that people clench when they are stressed. There are two other areas that are very common for people to clench during times of stress. These are the abdominal muscles and the gluteal muscles.
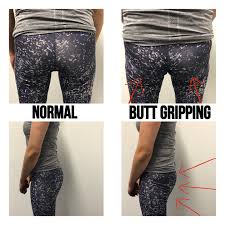
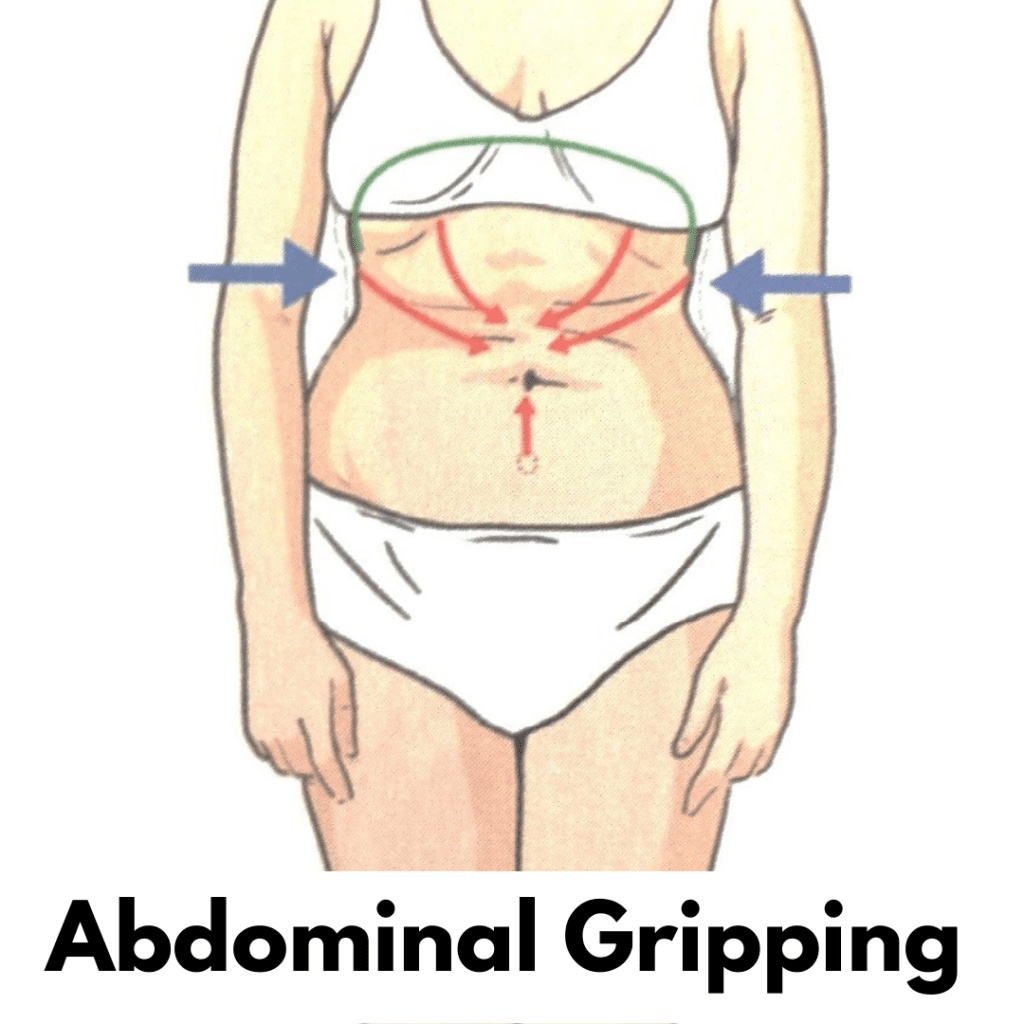
Excessive clenching in either of those two areas is known to lead to low back pain. There is a phenomenon in the body called irradiation. This phenomenon basically means that tension breeds tension. An example of this is if you were trying to lift something heavy with your right arm, and it was difficult, you might clench your left fist really tightly in order to build more strength in your right arm. So basically, creating tension in a nearby area increases the tension in that secondary area.
Increased tension in the abdominal muscles leads to increased tension in the low back muscles which will lead to pain. The same thing happens in the gluteal muscles. Our muscles are meant to work all together. When one group becomes dominant and overactive, this causes tension to increase all around that area.
If you're reading this and you are thinking that you can really relate to those three areas that I talked about above, you're probably wondering, "Well, what can I do about it.?"
There are two main things that need to be done for these problems to improve. The first is: you need to develop strategies for managing stress.
None of us can avoid stress. It's just a part of life. However, that doesn't mean that we just say woe is me and do nothing. So that means, if certain times of our life become more stressful than normal, we'll want to find strategies to mitigate the stress. I will talk about some specially helpful strategies in further blogs.
In conjunction with managing your stress, you want to find ways to alleviate the tension in the areas that are bothering you. Below, I will go over great ways to reduce the tension in the three areas I talked about above.
The contract-relax stretch is shown below. This type of stretch involves activating the muscle first and then stretching it. After a muscle has been activated, it's actually more susceptible to stretch.
2. For the inner shoulder blade muscles, I recommend using a lacrosse ball or trigger point ball.
a) For this, you're just going to go stand with your back against a wall. b) Put a lacrosse ball in between your shoulder blade and your spine. c) Then you're just going to move your torso and bend your knees in order to roll the ball all the way into the muscles in between the shoulder blades.
I recommend 60 to 90 seconds on each side of the spine.
For the jaw muscles, there are two main areas that need to be worked on. These are the jaw muscles, and the upper neck muscles. As I said before, clenching can cause both jaw pain and headaches that tend to be at the base of the skull.
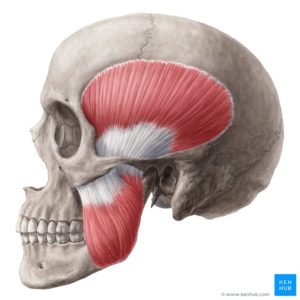
a) The first technique is a release of the tension in your jaw muscles. For this one you're going to take your fingers and find your cheekbones and follow your cheekbones back towards your ear. There are two main groups of job muscles that we want to release. One of them is above the cheekbones and the other one is below.
b) So first, we'll start on the ones above the cheekbones and you'll just move your fingers upwards into the area just in front of your ear. You're going to push your hands inwards like you're trying to go into your skull and then kind of drag the tissue up towards the ceiling. This pins the muscle. Then you're going to slowly open your jaw as wide as you can: this will stretch the muscle. The video below shows the release for the muscle that is above your cheekbones. You would just repeat the same technique in the muscles below your cheekbones.
The image below shows the locations of these muscles so you'll want to do multiple passes with your hands since the muscles are pretty large.
3. The last area are the muscles at the base of your skull. These are the muscles most commonly affected when we clench our teeth. And these are the muscles most commonly associated with tension type headaches.
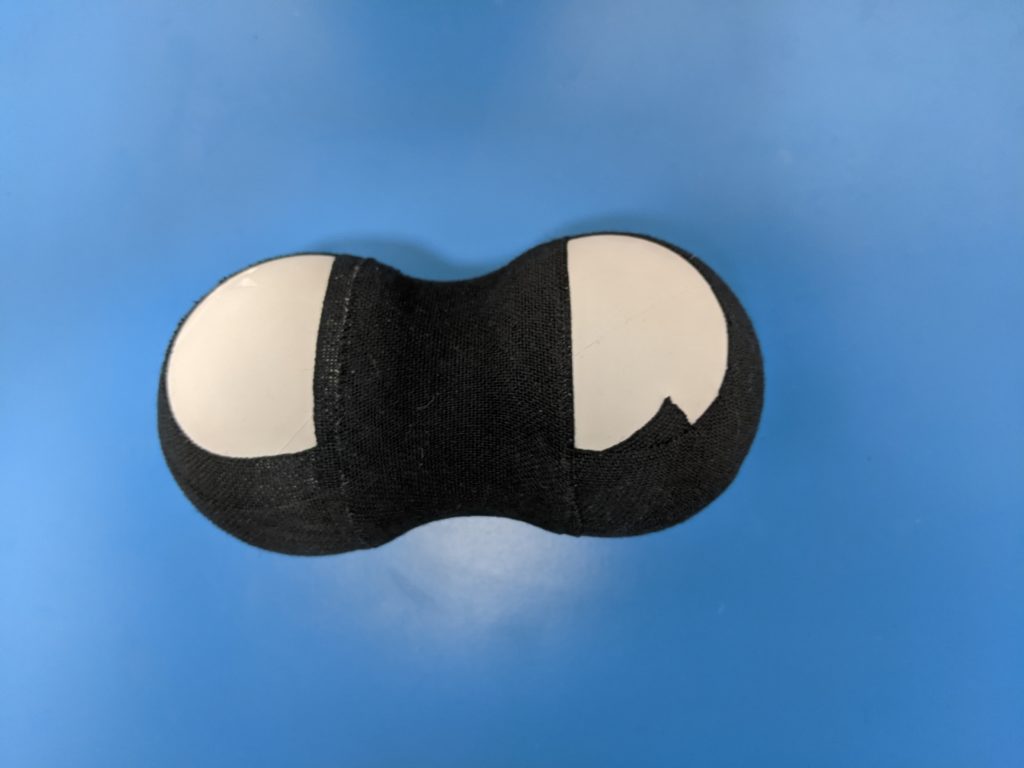
a) To work on these muscles, you're going to want to get either two tennis balls or two lacrosse balls and you're going to tape them together like the photo below. We call this device a peanut. b) What you want to do is to find a semi-hard surface and lie down on your back. c) Take the peanut and place it just below the base of the skull. d) You don't want the balls actually pushing on the bone of the skull - you want them in the fleshy area just below.
I recommend starting off by lying on this for 4 minutes at a time. Every couple of days, increase that by a minute until you get to 8 minutes. I don't recommend lying on it for longer than 8 minutes.
For the tightness that comes from gluteal muscle tension, we want to stretch out our hip muscles. The video below shows one of the best stretches to relieve tension in these areas.
If you are an abdominal gripper and notice tension in your abs daily ,the technique shown in the video below can be extremely helpful. He uses a much larger ball, but I recommend using a lacrosse ball in the same fashion as he shows in the video.
So there you have it. That darn stress really takes a toll on our body! But now you have some tools to fight back. Try these out and stay tuned for next week when I'll talk about stress management strategies.
And if you're dealing with a lot of pain right now and don't have time to wait for some of this stuff to work on your own, be sure to give us a call at 918-300-4084 and we can help you speed up that process of getting out of pain!


We have all heard that modern life is stressful. News articles talk about stress management, the health consequences of stress, and how to cope with stress. But ... what exactly IS stress?
With the holidays upon us, I wanted to do a deep dive on stress. During the month of December, I'm going to talk about the effects stress has on our bodies, and how to manage the stress we're all under.
In this first blog I'm going to talk about what stress is, what are the different types of stress, and what's the difference between stress and anxiety.
So what exactly is stress?
Stress is any type of change that causes physical, emotional, or psychological strain. Basically stress is your body's response to anything that requires attention or action.
But stress is not always a bad thing. There's actually two different types of stress: distress and eustress.
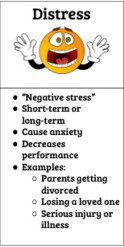
Distress is any stress that has a negative effect on us. It has the following characteristics:
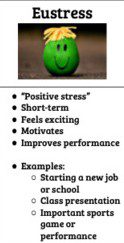
Eustress is any stress that has a positive effect on us. The characteristics of eustress are:
Examples of distress would be things like the death of a loved one, losing your job, or experiencing a significant injury.
Examples of eustress would be things like getting a promotion at work, graduating from school, or winning the lottery.
One important thing to understand is that while both distress and eustress have very different effects on our mental and emotional health, they can both have detrimental effects on our bodies. They both can tax our body's reserves and produce negative physical effects. Stay tuned throughout this month and I'll go over many of the different negative physical effects of stress and what to do about them.
When you hear people talk about stress, it's common to hear them talk about anxiety as well. Those two terms are often presented as if they are the same thing. Stress and anxiety are definitely similar, but they are not the same thing.
What differentiates stress and anxiety is the source of the strain. The source of STRESS is external. This means the strain on the body is from outside. A work deadline, financial obligations, losing a loved one, these are all external factors. If the source of the strain is taken away, the strain goes away. If you complete that work project, the stress of the deadline goes away. If you come into some money, the stress of bills goes away. That is how stress works.
However, with ANXIETY, the source of the strain is internal. You can think of anxiety as what happens inside of us in response to stress. Maybe you start to worry constantly about money when you experience some financial difficulties, or perhaps a loved one dies and you start to become obsessed with the fear of your own death. These are both an internal response to stressors.
The main difference between anxiety and stress is that anxiety can remain long after the actual stressor has passed.
So there you have it. Now you know that there are actually two different types of stress. While their effects can be different, it's important to understand that they both drain the body's resources - so they can have negative effects. You also now know the difference between stress and anxiety. Mainly that stress is an external event and anxiety is how we deal with stress internally.
Stay tuned this month as I will be explaining the effects of stress on the body (You won't believe all the different ways it affects you!), and how to manage stress to reduce its harmful effects.
You are going to learn so much this month! Thanks for taking time out to educate yourself on stress/anxiety and how you can make your own life better by managing them.
Remember, this month often brings various external pressures to bear - and causes stress for a lot of us. We're here for you - we can help balance your body and alleviate some of the effects of that stress. We'd love to see you in our new location! Just give us a call at 918-300-4084

Cervical disc bulges can be a very painful condition. However, this condition can resolve very quickly with the proper at-home care. In this post, I'm going to give some tips for at-home care that can help a cervical disc bulge get better very quickly. If you know that you're dealing with a cervical disc bulge, follow these instructions - and you could be pain-free in no time.
The first part of managing a cervical disc bulge is to understand what's going on. The discs in our spine are similar to a jelly donut. There is a hard outer shell with a gel center. This allows our discs to act as a cushion for the forces that go through our spine; they act as shock absorbers. Without our discs' protection, anytime we fell down, or had a hard bump into something, we would be at risk of compression fractures in our spine. Our discs help to absorb the force of these various blows, and they keep that force from being focused into the bones of our spine.
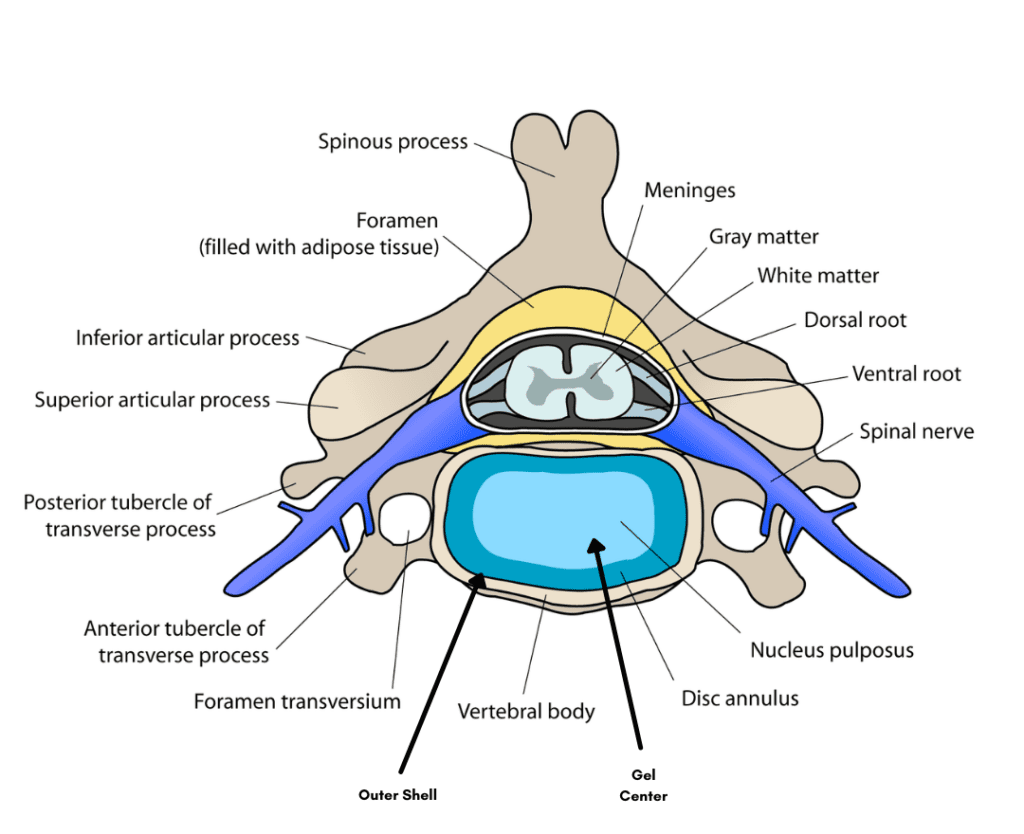
The structure of the disc actually moves with our spine. The gel and the center of the disc is called the nucleus pulposus. Whenever we bend our spine forward, that gel is pushed to the back of the disc and whenever we bend our spine backwards, the gel moves to the front of the disc.
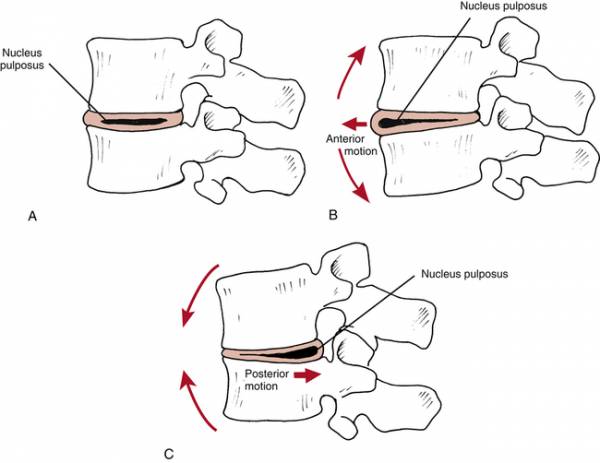
If you think about it for a minute, you can see that most of our daily habits - things like computer usage, usage of cell phones and tablets, reading, and many others - cause our Cervical spine to bend forward. Very few of our common daily habits bend our Cervical spine backwards. Due to this mismatch in movement of our spine, the gel in the center of many of our discs, over time, can start to migrate towards the back of the disc. This eventually starts to put pressure on the outer shell of the disc in the back.
Eventually, this will start to weaken the outer shell and can lead to a bulge in the back of the shell. When this happens in our neck, it's referred to as a cervical disc bulge. This can cause pain and irritation in the neck and tightness in the muscles of the neck.
The other symptom that can be very painful when experiencing a cervical disc bulge is pain in the nerves that go into our arm. When the disc starts to bulge in the back, it can come into contact with the nerves that exit our neck, leading into our arms. This bulging can lead to pain, numbness, tingling, burning, and weakness in the arm.
The proper home care will often allow Cervical Neck Bulges to get better very quickly. Below, I'm listing the best tips for things to do at home that can help you feel better as quickly as possible.
The nerves in our neck react to inflammation differently than the nerves in our low back. The discs in our neck are prone towards excessive inflammation. Scientists have shown in research studies that the nerves in our neck can swell up to twice their normal size when in the presence of inflammation. This can make them twice as likely to get pressed on during a cervical disc bulge.
I often explain disc injuries to my patients as being similar to getting a cut on your knuckle. If you have a cut on your knuckle and you continually bend your finger all day long, the scab gets ripped open multiple times a day - clearly, it will take longer to heal.
A similar effect happens with disc injuries. Since bending our spine forward pushes the gel to the back -- then, every time you bend your spine forward while you have an irritated disc, that bending will cause the disc to become further irritated. This can lead to a constant cycle of pain.
So - when you have a Cervical Disc Bulge, after you've taken actions to STOP the Inflammation, the next tip for you is to limit how often you bend your neck forward (this stops "the scab" from reopening).
This tip alone can be a miracle that helps decrease/eliminate pain during a cervical disc bulge.
Once you quit "picking the scab" each day, you'll notice the pain start to get better very quickly. The next step is to start to move the gel in the disc back to the center.
To do this, we have to use the motion of our spine to accomplish it. As I mentioned above, bending our spine forward too much moves the gel to the back. So in order to move the gel forward to the center, we have to bend our spine backwards often.
To do this, we use an exercise called a chin retraction. In the video above, you'll see this exercise demonstrated. You need to sit up tall and pull your chin backwards like you're giving yourself a double chin. Once you've moved your chin back as far as you can using the muscles of your neck, you will use two fingers on your chin to push your spine backwards even more. If you are having nerve pain going down into the arms, you want to make sure that you use two fingers of the arm that is not painful when you do this exercise.
When you do this action, the gel in the disc gets pushed to the back -- finally, after many years of bending our spine forward more than we've been bending it backwards. So in order to effectively reposition that gel correctly now, we have to bend our spine backwards a lot. At the beginning of a cervical disc bulge, you will want to do 10 of these chin retractions every two hours that you're awake.
The final tip is to get the pressure off the nerves.*
*This tip should only be used if you're having nerve symptoms in one of your arms. When the disc presses on your nerves, it can change the way your nerves move in your arm when you're doing daily tasks.
There are usually three main nerves that can be affected when we have arm pain during a cervical disc bulge. These are the median nerve, the radial nerve, and the ulnar nerve. In order to improve how these nerves move, you would use the exercises shown below.
Each of these three nerves supplies different parts of your arm with sensation.
Note: You would want to do the exercises 1 to 2 times a day and do 10 repetitions each time. These exercises can greatly diminish the symptoms in the arm especially when paired with the chin retractions.
So there you have it! Cervical disc bulges can create a very painful and debilitating condition.
But they can also resolve very quickly if managed correctly. If you know you are dealing with a cervical disc bulge, try these tips and you may likely find that your pain gets better very rapidly!
If you try these tips and are still in pain, your best course of action is to get treatment.
We treat these conditions every day at Movement Laboratory and are very successful at resolving this injury without surgery. Give us a call at 918-300-4084 and schedule an appointment today to let us help you with your cervical disc bulge!
By: John H. Keefe IV, D.C.
The Neck Assessment is part of my new blog series, titled ----"Check Yourself Before You Wreck Yourself". In this series, I will be teaching mobility self-assessments and corrective exercise stretches. You will learn how to check the function of different areas of your body. If you find a problem, I will teach you step-by-step how to improve the movement in these areas.
Today I want to demonstrate three self-assessments for the neck. Those are:
The first self-assessment/test - for Neck Flexion - is shown in the video above. The goal of this assessment is to be able to touch your chin to your chest without separating your teeth (opening your jaw) in order to accomplish that.
This is a test that many people will not be able to do. Many of us, due to sitting and working on computers or looking at our other technology, become tight in areas that restrict this motion.
An inability to pass this test means that you are at increased risk for neck pain in general. You're possibly also prone to getting tension headaches, migraines, and jaw pain. If you're unable to pass this test, try the corrections listed below.
The first correction is shown in the video above. It requires the use of a "peanut" which is made by simply taping either two tennis balls or two lacrosse balls together.
There are two main muscle groups we want to target to help improve the Neck Flexion range of motion. The first are the muscles at the base of your skull.
Once you have finished this corrective action, repeat the test. You'll notice that you'll be able to bring your chin down closer to your chest.
Doing this once may not immediately enable you to pass this test, but if you work at it for just a week or two, you will likely be able to pass the test.
The second self assessment looks at your ability to rotate your head from side to side. For this test, you're going to slowly turn your nose one direction as far as you can. Once you get as far as you can, try to bring your chin downwards to touch your collarbone. To pass this test, you should be able to touch your chin to about the middle of your collarbone on each side.
The muscles that restrict this movement are very commonly indicated in general neck tightness, neck pain, and tightness due to stress. If you're unable to pass this test, try the corrections below.
Once you finish this stretch, repeat the self-assessment. Like I said with the first self-assessment, doing this once may not immediately enable you to pass the test - but if you work on these stretches for at least 2 weeks, you should see great improvement on this test!
So there it is. That's my first entry for this new blog series entitled "Check Yourself Before You Wreck Yourself!" Make sure you stay tuned to future blogs for the next part in this series. The things you'll learn will allow you to take control of how your body moves and help you to eliminate pain yourself!
SPECIAL OFFER!
"Check Yourself Before You Wreck Yourself" Course - Available here on my Website under "Courses" Tab
In collaboration with Zac King, I have an extended online course of the same name for anyone who is interested. This course has many self-assessments for the rest of the body and self-corrections to help improve any areas that are problematic. We're offering a special promotion for anyone who would like to sign up for the course and get $10 off! --- That makes the Entire Course only $29.99!
Get signed up today if you want to take control of your movement and eliminate pain on your own! Click the following link to sign up today: https://movlabtulsa.com/courses/
And don't forget - if you run into any issues, or if your neck isn't responding as you wish, MovLab is here to help at any point in your neck rehab work - Mobility is our specialty! Just call us at 918.300.4084 to schedule your next appointment - you'll be glad you did!
Many of you have experienced the following situation.
Maybe your neck wasn't hurting at all - or maybe it hurt just a little bit, ... and then you lay down to go to sleep. But - when you woke up, your neck was stiff and sore and definitely worse than when you went to bed.
If this has happened to you, you need to read this article. These tips could make a big difference!
Sleeping should not make your neck pain worse or create neck pain if your neck wasn't hurting before.
The point here is that if you wake up from sleeping, and you have neck pain that you didn't have before, then there's something wrong with the way that you're sleeping.
In this article I'm going to give you the top three tips that will help you to eliminate neck pain when you sleep.
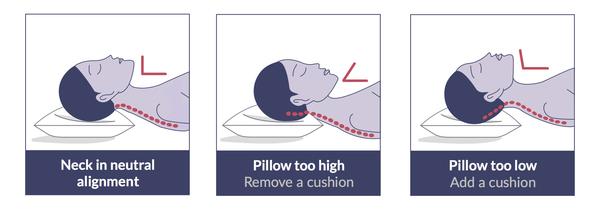
The most common reason for neck pain while sleeping is not having the right pillow for you. When we sleep, we want our neck to be in what's called a neutral position. In this position, our neck is mostly straight, but has a slight backwards curve.
Your sleeping position plays a big role in determining what is the right pillow is for you.
Stomach-sleeping is never recommended, and especially not if you have neck pain. T
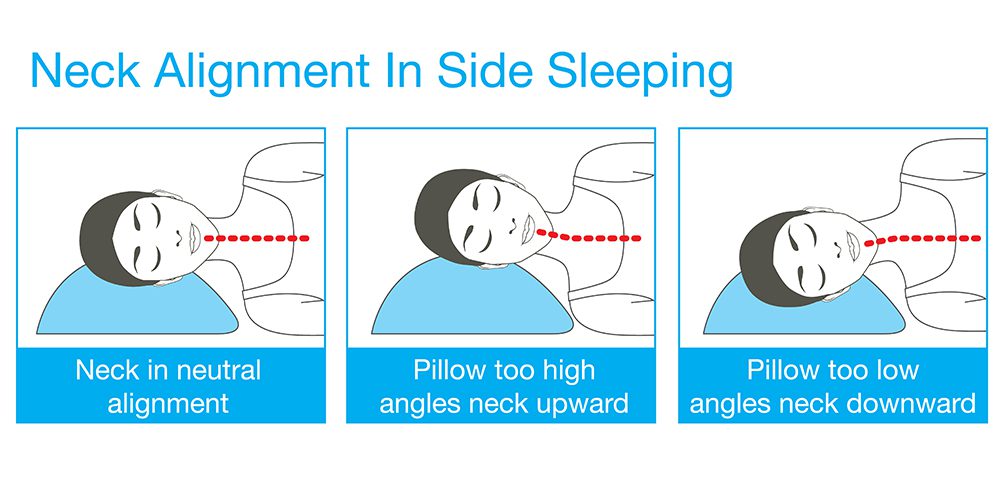
The distance between your mattress and your head is much smaller when you're laying on your back then when you're laying on your side. This means that you need a much-thicker pillow when you're lying on your side than when you're lying on your back.
Most side sleepers use pillows that are too small for them. This doesn't mean you need to go out and buy a brand new pillow. Many times, you can just add a skinnier pillow or even some folded-up towels underneath your existing pillow in order to maintain that neutral neck position.
Once you have found the pillow that is the right size for you, you then need to make sure that the rest of your body is in proper alignment. The area of the body that is most important in relationship to neck pain is our shoulder blades.
The most common issue I see that can contribute to neck pain is elevated shoulder blades. This means that the distance between your shoulder blades and your ears is smaller than it should be. This shortens the muscles of our neck and shoulders and causes them to feel tight and painful the next morning.
Once you are lying in a good, neutral position with your head on the pillow, your next step should be to consciously lower your shoulder blades downward and keep them there. The video above shows how to do this.
When you do this before you go to sleep, and you do it again any time you wake up in the night, you will greatly reduce the tightness and pain in your neck the following morning.
So - at this point, you've found the right pillow for you, you've got your shoulders and the proper alignment, and the last important checkpoint before you go to sleep is the position of your head.
Many of us sleep with our head extended. This causes our chin to jut out far away from our throat. In this position, the muscles at the base of our skull are put in a very shortened position. This can cause these muscles to contract, tighten up and be very sore in the morning.
Not only can this cause pain in the neck, but these muscles are highly connected to headaches. If you find you are waking up with headaches in the morning, this is a "must- fix" for you!
Watch the video below, and I will show you how to fix this.
You're on your way to better sleep and better neck mobility and strength in the morning!
There you have it.
You're all set to develop a new sleeping practice that will give your neck a break - and help you wake up refreshed and with your neck muscles relaxed and ready for a great day!
These three tips will greatly reduce any pain that you have in your neck after sleeping. If you try these tips and you're still having neck pain, I recommend you visit a healthcare practitioner for a proper examination and treatment plan.
If you live in the Tulsa area, Movement Laboratory is here to help resolve any neck pain that these three tips don't take care of. Give us a call at 918-300-4084 and schedule your appointment today!
*We have a "Giving Thanks" new-patient special we're offering for the month of November that gives you $85 off your new patient visit - you'll receive my Assessment and your first treatment for just $65 patient cost!
Don't wait - you can call to schedule today!