Foot Mobilization Vlog
This blog is in video format. In the video I go over three important mobilizations of the foot. In my previous blog I discussed the importance of stability of the foot and ankle. You cannot have proper stability in your feet and ankles unless you have proper Mobility as well. If you are lacking stability in your ankles try these foot mobilizations and see if your stability improves.
I've gotten a lot of feedback and questions about the feet in the last few weeks after I published my blogs on bunions. This week I wanted to talk about why our feet are so important for our overall health and wellness.
Our feet are literally our foundation.
They are the first thing that contacts the floor once we stand up and become weight-bearing. In addition to housing and maintaining the function of the muscles and joints that exist in our feet, there are also lots of nerves in our feet. Those nerves carry information to our brain and spinal cord that informs our brains about the structures of the environment around us.
If we are walking uphill, the nerves in the feet sense the stretch in the bottom of the feet from the hill and they begin to turn on the muscles that we use to raise our leg as we walk up the hill. If we are on uneven terrain, the nerves in the feet send messages to the brain and spinal cord that activate the stabilizing muscles in our hips that help to support us on uneven surfaces.
This is part of what makes the feet so important. As they encounter the ground around us, our feet send messages that help the rest of our body prepare for the environment that we are in. This is one of the reasons for the minimalist and barefoot trend emerging over the last 5 to 10 years. Much of our common footwear these days does not allow our feet to flex and bend and splay with the changes in our terrain. That limits the information coming in from the feet and makes our ankle, hip, and core muscles less able to anticipate the needs of the body.
Tightness in the feet and ankles can also limit this information. That is why foot and ankle mobility is so important. If your foot and ankle cannot bend and twist and splay, then those messages never get to the brain and spinal cord.
So this means there are two needs that our foot and ankle have to properly get our body ready to move.
In this blog, I will discuss how to make sure your foot and ankle get good exposure to the environment.
In my next blog, I will be going over how to make sure your foot and ankle have proper mobility.
The best way to make sure that your foot is able to sense the ground and the environment around you is to make sure that your footwear allows this to occur. This is why I recommend minimalist shoes for most feet.
When Minimalist shoes first came out, cushioning was thought to be bad, no matter what. And in my opinion, this is what caused many people to dislike minimalist shoes. Let's face it: If you are a marathon runner -- you're going to need some cushion. Thankfully, now minimalist shoes come with a wide range of features.
My recommendations for good Minimalist shoes for everyday use are the New Balance Minimus line, the Merrell vapor gloves, and splay shoes. These are really good shoes for going to work, working out, or walking or hiking. The links to find these shoes are below.
If you're looking for good Minimalist shoes for endurance sports like running, trail running, or long distance walking, I recommend Altra shoes and Topos. These are great foot-shaped shoes with no build-up in the heel and with good cushioning. The links to these shoes are below.
These shoes are a great first step to getting the most out of your foundation.
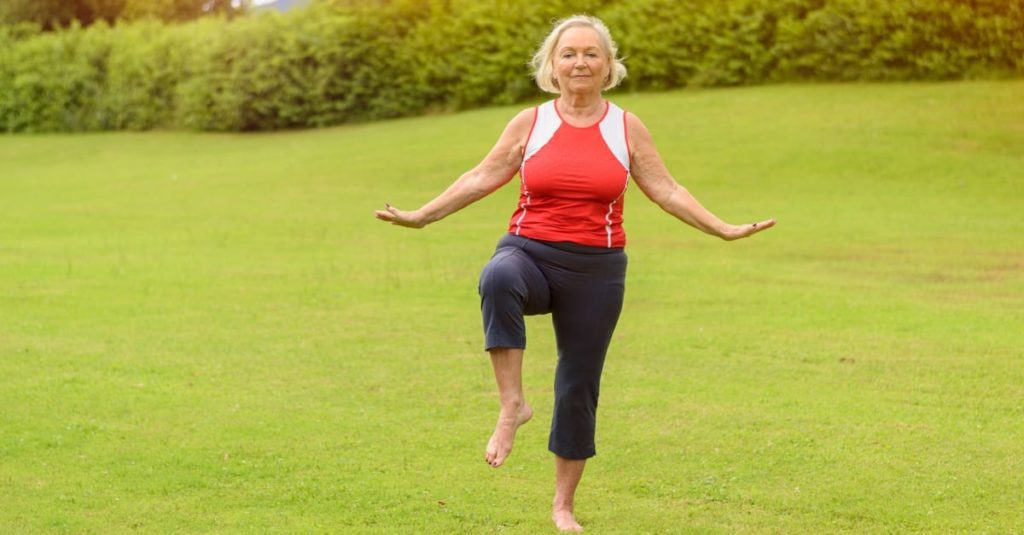
Additionally - and actually very importantly: I also recommend just walking barefoot in the grass as often as you can. Wake those feet up! Your body will thank you!
And remember, you can always check with me here at Movement Laboratory about any of your foot questions ---we're here at 918.300.4084 or dr.john@movlabtulsa.com.
Be sure to watch for my next blog about ensuring MOBILITY of your feet. It's a critical issue - and there are things you can do to increase your ability to move well on your feet!

Last week I went over the main things you need to know about bunions and how they affect you. This week we're going to cover what you can do to stop a bunion's progression or even reverse it!
So what does a strong foot look like? Well it's not what you think. We don't really need our feet to be especially strong - what we need is just for them to be active at the right times. Many people who have flat feet or bunions don't actually have weak foot muscles. It's more likely that they have weak hip and ankle muscles which then don't allow the foot muscles to activate like they should.
In order to have good strong feet, we have to be strong in other areas of the body as well. In this blog, I'm going to cover how to strengthen the feet, the ankles, and the hips. If you are strong in these three areas, that will stop the progression of bunions and sometimes even reverse them.
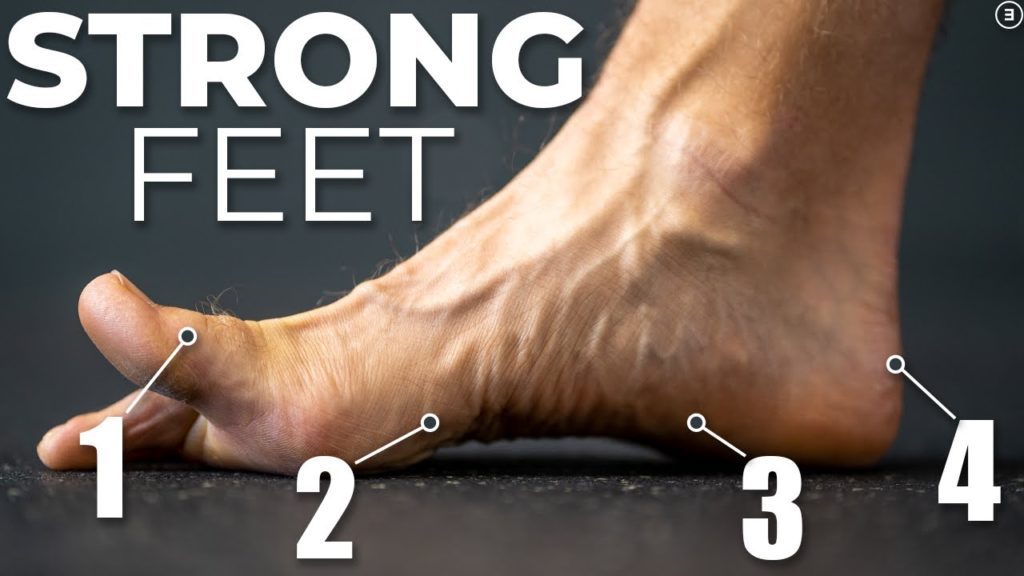
In order to strengthen the feet, we must first understand a little bit about how the foot works. The foot is constructed like a tripod. The three points of the tripod are:
A strong foot will keep these three points in contact with the ground as often as possible.
Our foot goes through a lot of different movements as we walk, climb, run and jump. The foot is meant to pronate, supinate, and be neutral and all the points in between. The issues that we have that lead to bunions tend to make our feet hang out most of the time in pronation. So in order to strengthen the foot, we need to strengthen the muscles that keep us either in neutral or supination.
The best exercise to help this is what's called the short foot exercise. When our foot pronates, it lengthens and becomes more wide. The short foot exercise helps to activate the muscles that do the opposite action. The video below shows how to do the exercise. I recommend doing just this exercise alone for two weeks. Usually doing about two to three sets of 10 at a time.
Once you feel confident doing this exercise, then you can start applying it to a lot of different situations.
Doing this will help to transition the short foot from being just an exercise that you do to something you can be practicing during your day in real world situations.
The next exercise to help strengthen your feet is called the Vele lean. This exercise is shown in the video below and it really helps to strengthen the muscles of the feet. The short foot practice combined with this exercise is a great one-two punch for strong feet!
The foot does not work alone. The hips and the ankles help to support the motions of the foot. You could have the strongest feet in the world, but if you have weak hips and ankles, your foot will still get in bad positions.
The first exercise to help strengthen your ankles is called the tibialis posterior raise. The tibialis posterior muscle is one of the prime supinators of the foot. If your foot over-pronates or pronates too fast, it means the tibialis posterior is not strong enough to resist that. The exercise is shown in the video below. I recommend doing three sets of 10 everyday.
Once you've helped to strengthen your tibialis posterior, it's time to work on the stability of the ankle. In order to do that, you have to challenge the ankle in a lot of different directions. The best exercise to do this is called toe reaches. The video below demonstrates this exercise. The key here is that you'll be standing on one leg and reaching the other leg out in different directions. Be sure that you try to keep the foot that is on the ground as still as possible. It is going to move a little bit. but you don't want it to be wobbling all over the place.
As I mentioned above, if your hips are not strong, your feet are put at a disadvantage. Bunions develop from feet that remain in pronation for too long. The hip muscles that help to bring the foot out of pronation are the external rotators of the hip, primarily the gluteus, medius, maximus, and piriformis.
A great first exercise to start strengthening these muscles is called a glute bridge with abduction. The exercise is shown in the video below. I usually have people start with two sets of 10 and slowly work up to three sets of 12.
The next exercise is a great one because it can work on almost all of those muscles at once. It is called a lateral band walk. The video is shown below. Pay special attention to the placement of the band. By placing the band around the foot instead of the ankles like this exercise is normally done, it really works on those external rotators of the hip.
The final exercise really works on increasing control of the hip rotators. This exercise is called the hip airplane. When you start this exercise, you'll want to be close to a wall or a table that you can use for balance. After a couple of weeks doing the exercise, you need to start taking your hand off of whatever structure you're using for balance, and starting to try to balance on your own. Eventually you want to be able to do this exercise without using anything for balance.
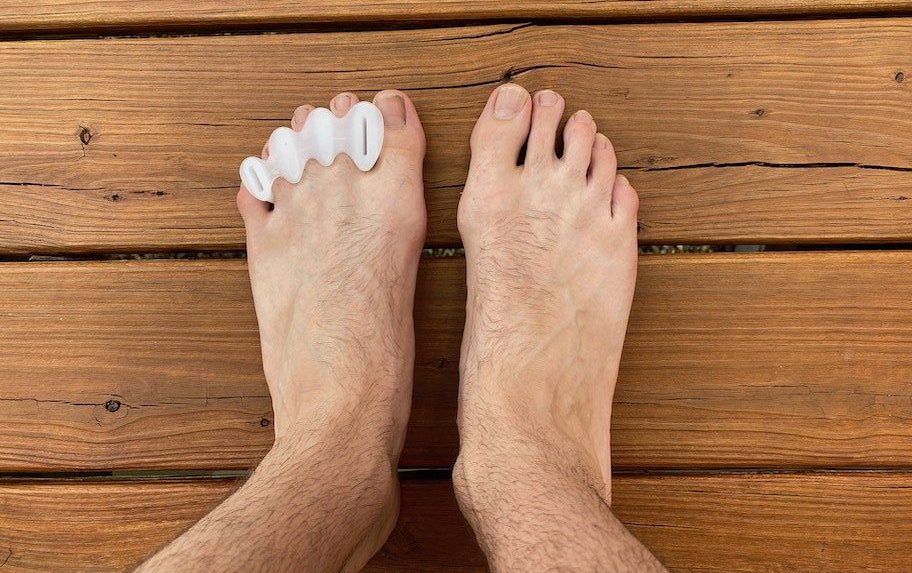
Special/Simple Device to Help Stop/Correct Bunions
One final recommendation for stopping bunions or reversing them is actually a device to wear on your feet. This device is called correct toes. This simple silicone piece can be worn at all times even with socks and helps to maintain the placement of the toes which can help the deformation of the bunion. I recommend this for all bunions! They can be purchased here: https://www.correcttoes.com/shop/correct-toes/correct-toes.html?gclid=CjwKCAjwrqqSBhBbEiwAlQeqGrrmlzau3uTeVCbstoyU37gGT-kNmsutB_DoQC7TX_qjHgJxF1TZVhoCHBgQAvD_BwE
_________________________________________________
So there you have it. If you have a bunion, or if you're wanting to make sure you don't develop a bunion, this program includes my recommendations to make sure you know what to do to help ensure those results! And if you are looking for more help with your feet, give us a call at Movement Laboratory at 918-300-4084 and schedule an appointment today. We help get people moving better and out of pain fast!

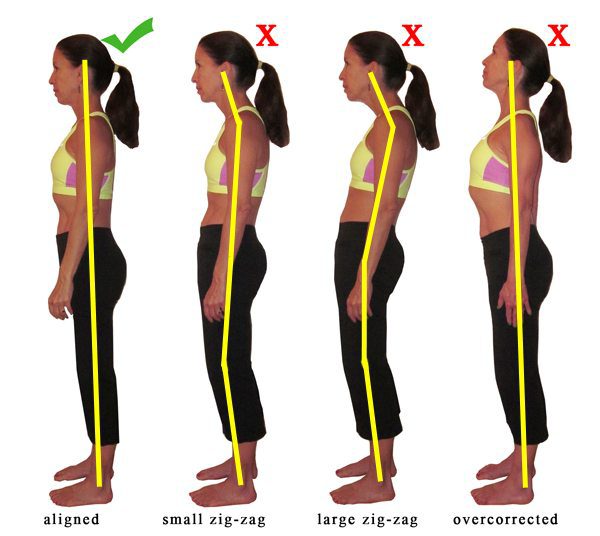
In today's world, we've pretty much learned that a functional core is vital to how our body performs. Many of the aches and pains that are common can be linked to an improperly functioning core. But what you may not know is that proper posture is a big player in how well your core functions.
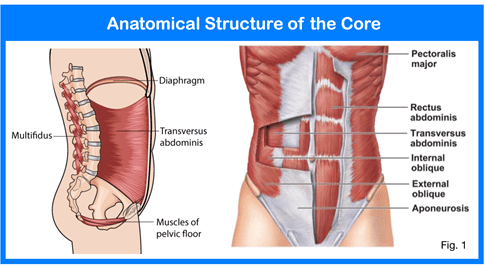
Our core is functionally a cylinder. It has cylindrical walls and a roof and a floor. The walls of our core are the deep abdominal muscles in the front and sides and our spinal muscles in the back. The roof of the core is our diaphragm. The floor of the core is our pelvic floor muscles. The picture above illustrates this.
In order for the core to function properly, the walls, roof, and floor must all be aligned properly. The purpose of our core is to do two things: Our core attaches the top part of our body to the lower part, and it creates something called intra-abdominal pressure.
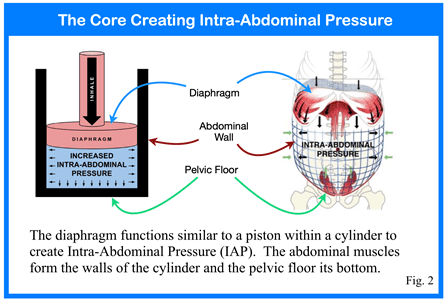
Intra-abdominal pressure is vital for proper core function. To picture what intra-abdominal pressure does, you need to imagine blowing up a balloon as much as you possibly can. Then imagine grabbing the balloon from the top and the bottom and trying to twist it or fold it over on itself.
If it's completely full of air, this will be difficult. But imagine you let a little bit of air out. Now it's easier to twist and bend that balloon.
The same concept applies to the core. When we have good intra-abdominal pressure, it helps to stabilize our spine and make it hard to bend and twist. This is important when we're lifting heavy things to help keep our spine safe. When we don't create intra-abdominal pressure well, our spine is vulnerable.
The roof has to be stacked directly over the floor. In regards to posture, this means that your diaphragm needs to be stacked directly over your pelvic floor. Your diaphragm is attached to your rib cage and your pelvic floor is attached to your pelvis. So, if your rib cage or pelvic posture is not ideal, then you are at a disadvantage for creating intra-abdominal pressure.
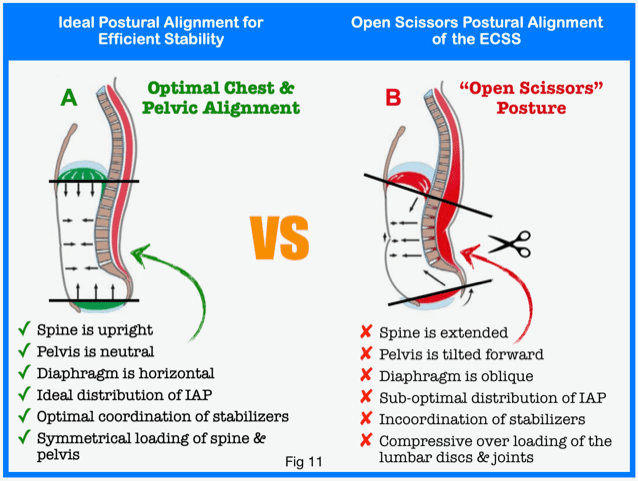
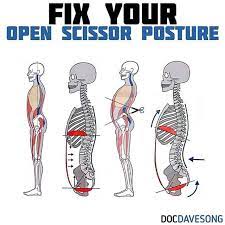
Many people have what's referred to as "open-scissors posture." This is when we have a little bit of an excessive arch in our low back that causes our rib cage to be tilted backwards and our pelvis to be tilted forwards. This creates really bad alignment and hinders the creation of intra-abdominal pressure. The picture above shows the open-scissors posture.
The video below shows the proper postural alignment and how to put your body in the best position to enable your core to function.
The exercises below are great to help make those postural corrections permanent. Remember to start these exercises with proper alignment.
It's easy to see how your Posture affects your Core!
And there you have it. Now you have some great tips for how to align your body to get better core function. If you are reading this blog because you have pain related to poor core function, we can help! Just come see us at Movement Laboratory to experience the MovLab Difference!
Using Chiropractic care and specific therapeutic exercises, we get people out of pain and back to what they love FAST! Call us at 918-300-4084 to schedule your appointment today.
When your low back is hurting, sitting can be a rough proposition. This is because sitting puts a lot of pressure on your low back. Sitting incorrectly can make work or other tasks that require long periods of sitting a very painful experience. In this blog, I want to introduce some simple tips to greatly reduce your pain from sitting.
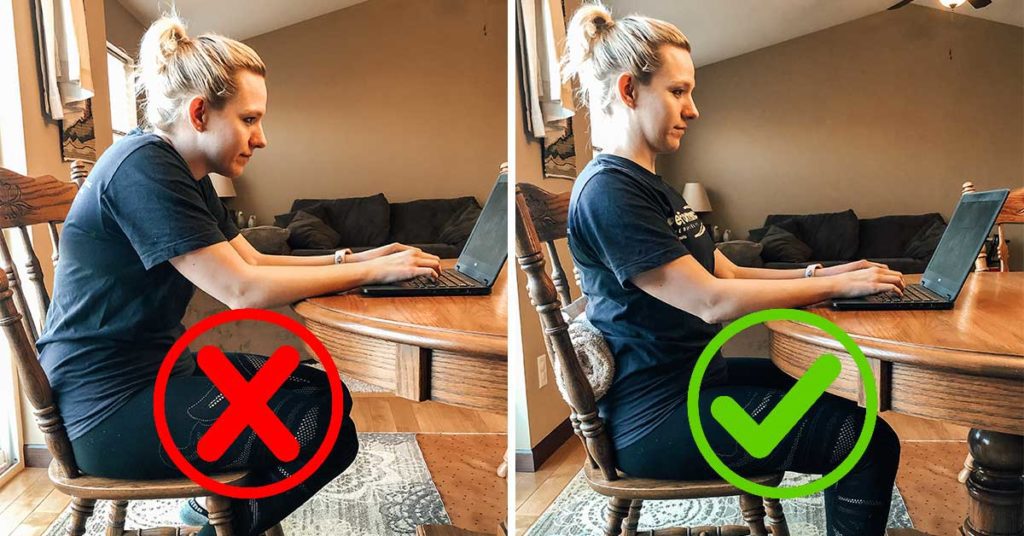
The bottom of your pelvis has two thickened pieces of bone that are designed to support your weight. These are called the ischial tuberosities or more commonly referred to as our "sit bones". The picture below shows these bones.

The problem is many of us don't actually sit on our sit bones: Instead, we sit on our tailbones. Doing that puts a lot of pressure on our low back and can be a big contributor to pain when sitting and after sitting. When you slouch while sitting, you're shifting the weight off of your sit bones and back to your tailbone.
If you have low back pain when sitting, pay attention to that! Make sure to rearrange yourself. Sit up tall and find that neutral sitting position that makes you feel like your weight is resting on your sit bones. The picture below shows the right way to sit and the wrong way.
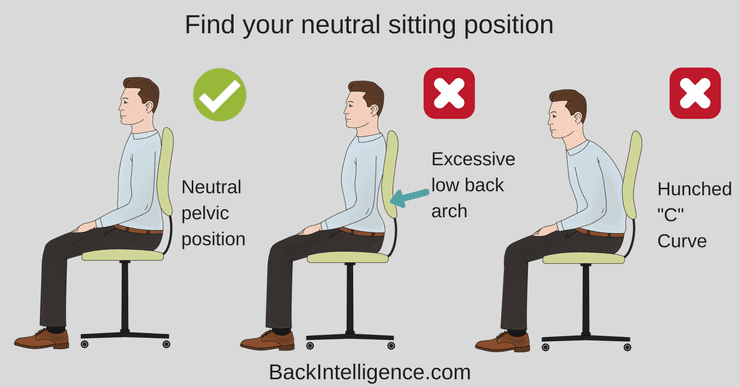
In order to find this important neutral position, sit in your chair, slouch and let your pelvis roll backwards, then roll your pelvis the opposite way by excessively arching your back. These are the two extremes. Then find the middle point between these two positions and that is your neutral. Sitting in neutral will greatly reduce low back pain.
The discs in your low back are under different amounts of pressure throughout the day. Some positions put minimal amounts of pressure on your discs and some put a lot of pressure on your discs.
We all have to sit at some point in our lives. Some jobs require a lot of sitting. We can't avoid sitting. But we can break it up.
Research has found that taking breaks from sitting can reduce pain from sitting. That same research has found that it's the quantity of breaks that makes the most difference - not the length of the breaks. So its better to take a 10-second break every hour than to take a 30-minute break every three hours.
I recommend taking a break every 50 minutes. This break can be 10 seconds or 5 minutes.
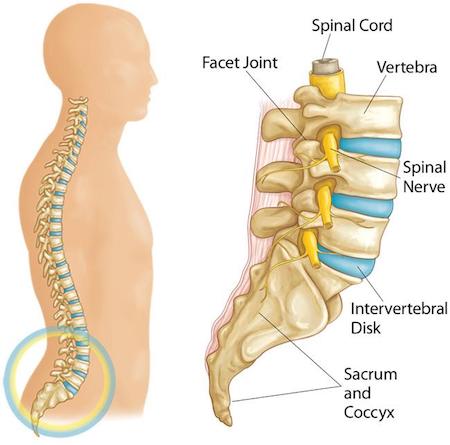
The bones of your low back have three joints with every bone above and below them.
When your low back is leaned forward, such as when you slouch, the weight is shifted forward so that your disc joints bear most of the load.
When your low back is hurting, putting most of the weight on your discs is not a good idea.
When you instead have a backwards curve in your low back, the weight is shifted backwards towards the facet joints. Creating that backwards curve as you sit can greatly reduce the pain in your low back. The picture below shows these joints.
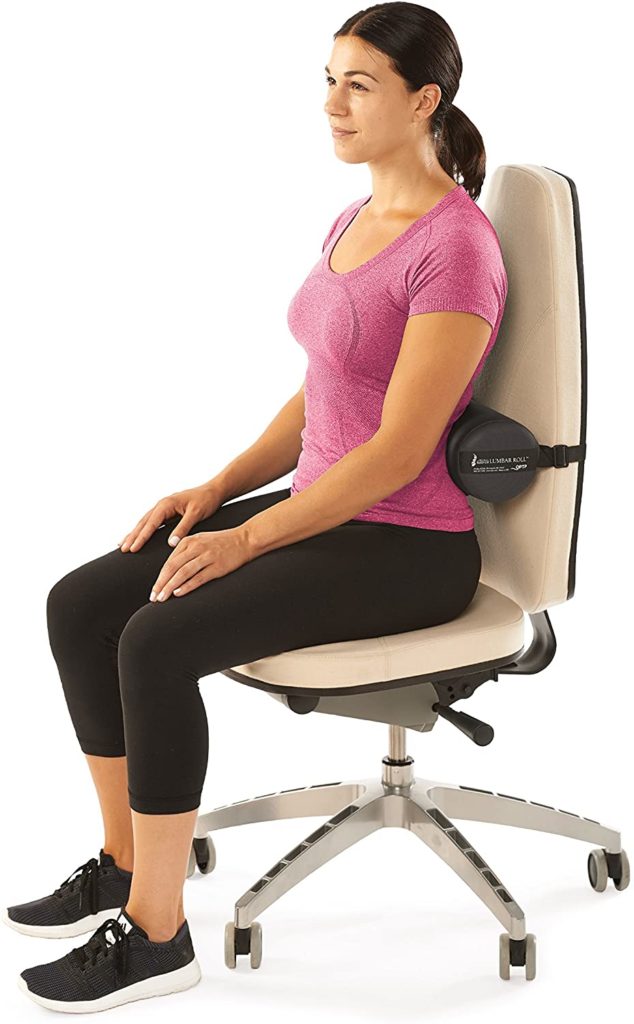
Lumbar supports are devices used to help shift the weight more towards the facet joints so the discs are not bearing all the weight. If sitting upright and taking sitting breaks still leaves you with lots of low back pain when sitting, then you need to try adding a lumbar support.
I recommend what's called a lumbar roll. The picture below shows one of these devices. The device can be strapped to any seat, so you can take it with you from your work chair to your car and to your couch at home. The picture below shows a lumbar roll.
You want to make sure you place it correctly for it to be most effective. The video below shows how to position it on your back to get the best results.
If posture correction and breaks are not enough for you, try a lumbar roll. Make sure you use it every time you sit for 3-4 weeks and you should notice a significant decrease in your low back pain when sitting.
So there you have it. 3 simple tips that will make a big difference in your low back pain when sitting.
If you want some help to make that back pain a thing of the past, come see me at Movement Laboratory at 92nd & Sheridan. Most of our low back pain patients get 80-100% improvement in their pain in just 3 weeks!
If that sounds good to you, give us a call at 918-300-4084.
Hello! Can you believe we made it through the holidays, and it's already January? Along with other things, that means there's a whole lot of us who are hitting the gym, either for the first time ever or for the first time in a while.
This is a great thing. Movement and exercise are actually necessities for our bodies to function properly. Keeping a regular, consistent movement-and-exercise routine can really help keep our bodies function better. So I'm always glad when I hear about people getting serious about staying MOBILE.
However, this is also a time when our practice sees a lot of injuries from people doing a little too much, too fast, as they start to live out their New Year's resolutions.
The vast majority of these injuries can be boiled down to two things:
For this first tip, we need to go over a concept called the core cylinder. The basic purpose of our core muscles is to attach our rib cage to our pelvis. This helps to stabilize our spine and protect it when lifting heavy loads.

If you don't stack your rib cage over your pelvis, your low back pays the price. The picture above shows the most common postural fault that I see daily in my practice. This position is called the open scissors position. This position disconnects your rib cage in your pelvis and leaves your low back to do the majority of the work when lifting weights.
So the first step is to learn how to stack your rib cage over your pelvis with an active core. The picture above shows the proper alignment between your pelvis and your rib cage when lifting weights. So before you start any lift, make sure to drop your rib cage into your pelvis so that the two are stacked on top of each other. This will greatly reduce the strain on your low back and reduce injuries when lifting.
The number one lifting injury that I see in my clinic is to the low back. However, the number two injury is shoulder injuries. Many shoulder injuries that result from lifting originate with bad form in upper body exercises.
This can be fixed by putting your shoulder blade in the strongest position possible before starting any upper body lifts. The video above demonstrates the most common non-ideal shoulder positions that many of us commonly utilize.
After showing what poor positioning of the shoulder blade looks like, the video above shows how to properly position your shoulder blades as you prepare for upper body lifts. This position lets the maximum number of muscles contribute to upper body lifts in order to not overload any one muscle in the shoulder.
If you follow these recommendations, you will notice much less shoulder pain when doing upper body exercises
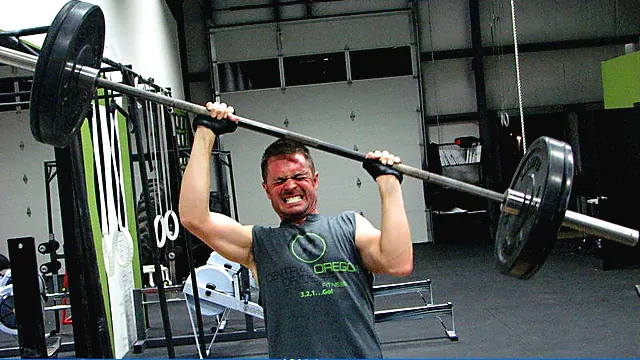
The third most common injury I see with people starting exercise routines is neck and upper back pain. Many of the muscles of the upper body have some connection to the neck and upper back. If the neck is not in an ideal position, lots of injuries can occur when doing upper body exercises.
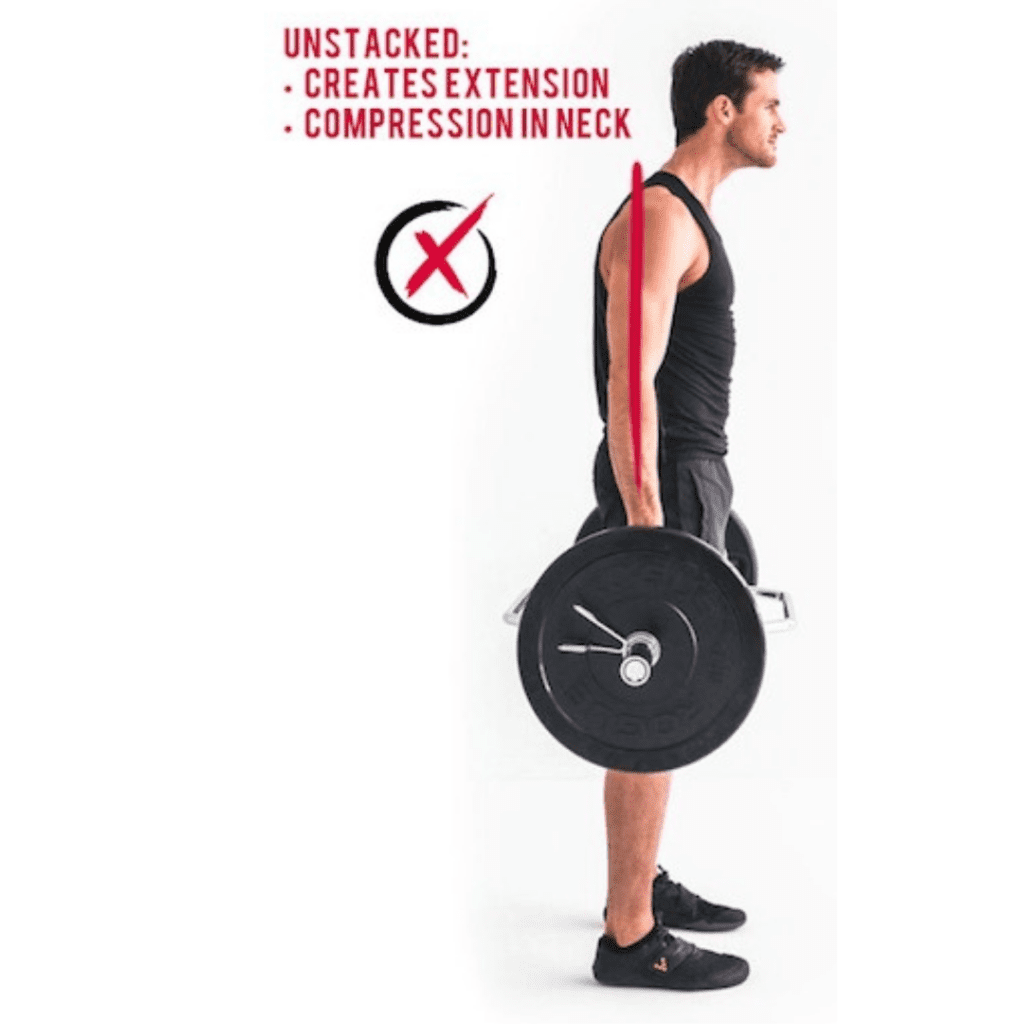
The picture above shows the common issue many people have with their neck position when doing upper body lifts and exercises. This position really puts the neck and upper back in a vulnerable position and can easily lead to injury. Notice the difference in the position below as the model STACKS his bones correctly.
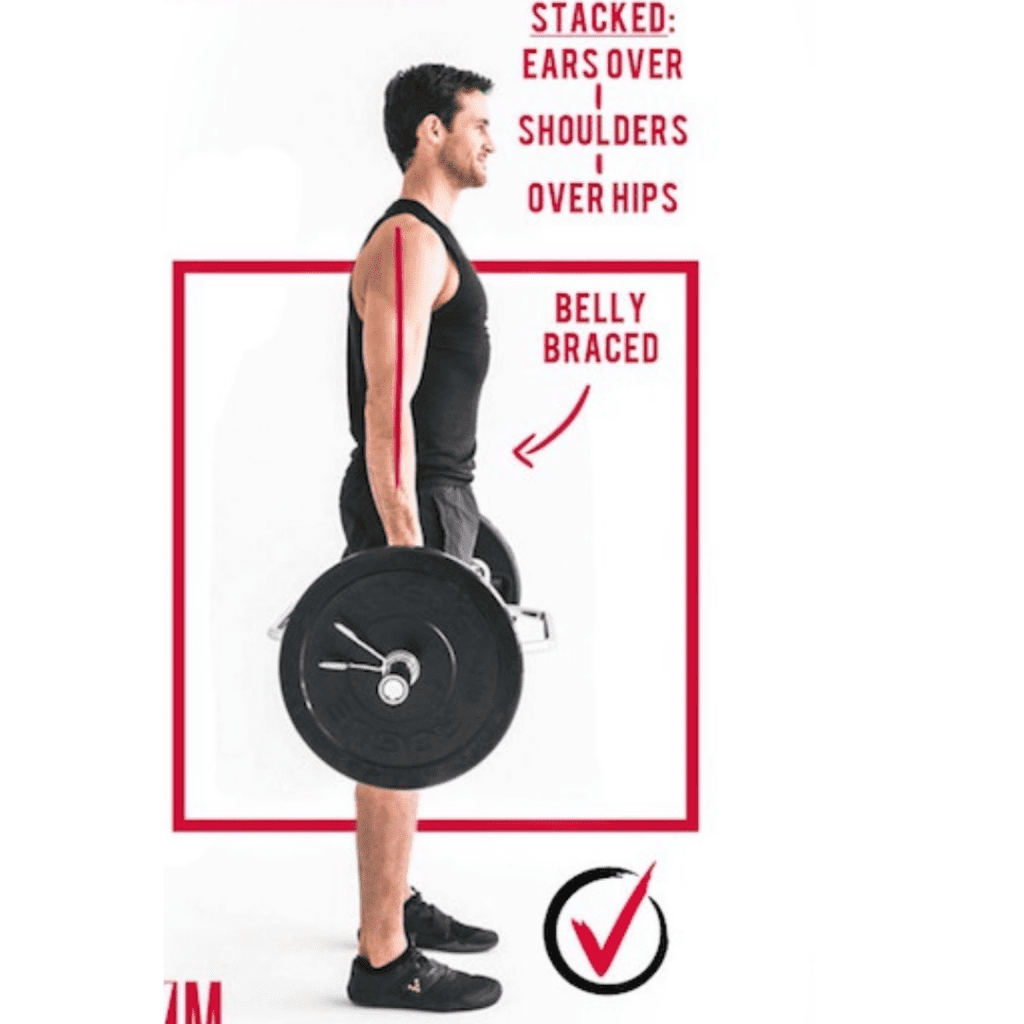
The picture above shows the proper way to position your neck and upper back before you start any upper body lifts. Position your neck and upper back as you see above and you'll notice much less neck, shoulder, and upper back pain when doing upper body exercises.
So there you have it. Follow these three steps and you will have much fewer issues with injuries when lifting weights in the gym. If you read this blog too late - and you are already dealing with an injury from the gym - give us a call at Movement Laboratory - 918-300-4084 - and let us help you get out of pain and back to seeking those gains in this new year!
Lifting ... It's the most common cause of low back injury. And low back pain is the most common cause of disability in the United States. So it's really important that you lift correctly!
There are lots of sayings like, "Lift with your knees, not with your back," - and they are mostly right. But the one that I like the most is the title of this blog! "Lift with your butt, not with your back."
Did you know that your butt muscle, the gluteus maximus, is the largest muscle in your body?! It was made, in part, for lifting heavy things. In contrast, your low back muscles are actually pretty small in comparison. Clearly, our bodies were designed to lift heavy things using our butts.
In this blog, I'm going to go over 3 tips to make sure you're lifting with your butt and not your back.
The general rule of thumb in lifting is this:
Whatever body part you bend to get down to pick up the weight is used to lift it up.
So the key to sparing your spine when you're lifting is to just not bend it in the first place.
There are three basic movement patterns that we use to lift things from the floor, whether in daily life or at the gym. These movement patterns are the squat, the lunge, and the hip hinge.
Doing these movements correctly involves maintaining a neutral spine. While the hips and knees bend, the spine stays neutral and tall. Below, you will find videos demonstrating the proper body alignment when doing these three movements.
The main muscle groups that we want to use when we're bending and lifting are on the back side of the body. In order to load these muscles and make sure that they are the dominant ones used when lifting something heavy, you have to make sure that your body does what's called a posterior weight shift.
This means that your center of gravity shifts backwards in order to stretch the muscles on the back side of the body so that they can then be used to lift whatever you're lifting.
To do this, you want to make sure that you feel the weight of your body in your heels and not up at the balls of your feet. Watch the video below to find out how to get your weight in your heels.
Many of us over-rely on our back muscles when lifting. At the top of a lifting motion, you want to feel a strong abdominal contraction and butt muscle contraction. This means your hips are doing the lifting. If you bend over to lift something, and as you raise back up, you feel a strong contraction in your low back muscles, this means you are not using your hips.
You want to focus on using the hip muscles to do the lifting. The video below shows how to do this.
So there you have it. We will all be lifting presents, kids, decorations, etc. in the next few weeks. If you want to make it through without hurting your low back:
"Lift with your butt - not with your back!"
If you read this too late and you are already hurting, give us a call at Movement Laboratory at 918-300-4084. Schedule an appointment today to get out of pain fast!
The holidays can be an amazing time. We often get to see family, we make time to get together with others and share our lives, and we get to share gifts with those we love. However, the holidays can also be a difficult time when we're in pain. If pain prevents us from participating in the holiday festivities, that can make us feel distant from those around us.
It's a tough thing to not be able to join in with the family and share those holiday activities. Low back pain is often one of the most common issues that people deal with during the holidays, and it can prevent us from being able to jump right in and share in the making of memories.
This season may require a lot of work. There's putting up those lights and decorating the front of the house, decorating the inside of the house, preparing the meal, wrapping gifts, and many other manual tasks. They can provide a lot of strain to the low back. If you were already in pain, this additional activity can flare up that situation. But also, even if you were not in pain before, the work of getting ready for the holidays can make your low back hurt all by itself. But don't lose hope! I'm going to share three awesome tips with you to help you avoid low back pain during this holiday season.
Getting ready for the holidays can require lots of bending and lifting. Whether it's setting up the decorations, getting food prepared and arranged, or picking up those precious grandchildren, many of us wind up doing a bunch of bending and lifting that we may not be accustomed to doing.
Bending and lifting is a known cause of low back pain if done incorrectly. So in order to get through your holidays without a low-back flare-up, you want to pay close attention to your form when bending or lifting.
The largest muscle in our bodies is the gluteus maximus. These are your butt muscles. Right next to those muscles are your hamstrings. These are also big strong muscles. When you bend and lift anything, take care to ensure that you are relying mostly on your glutes and hamstrings to lift -- and not your back muscles.
In order to set these muscles up to do the work when bending or lifting, you have to pay attention to your posture. When you bend down to lift something up, if you bend your spine too much, you have to use the muscles in your spine in order to come back up from the bend. So instead of bending with your spine to lift something up - take care to instead bend with your hips and knees. This motion is called a hip hinge.
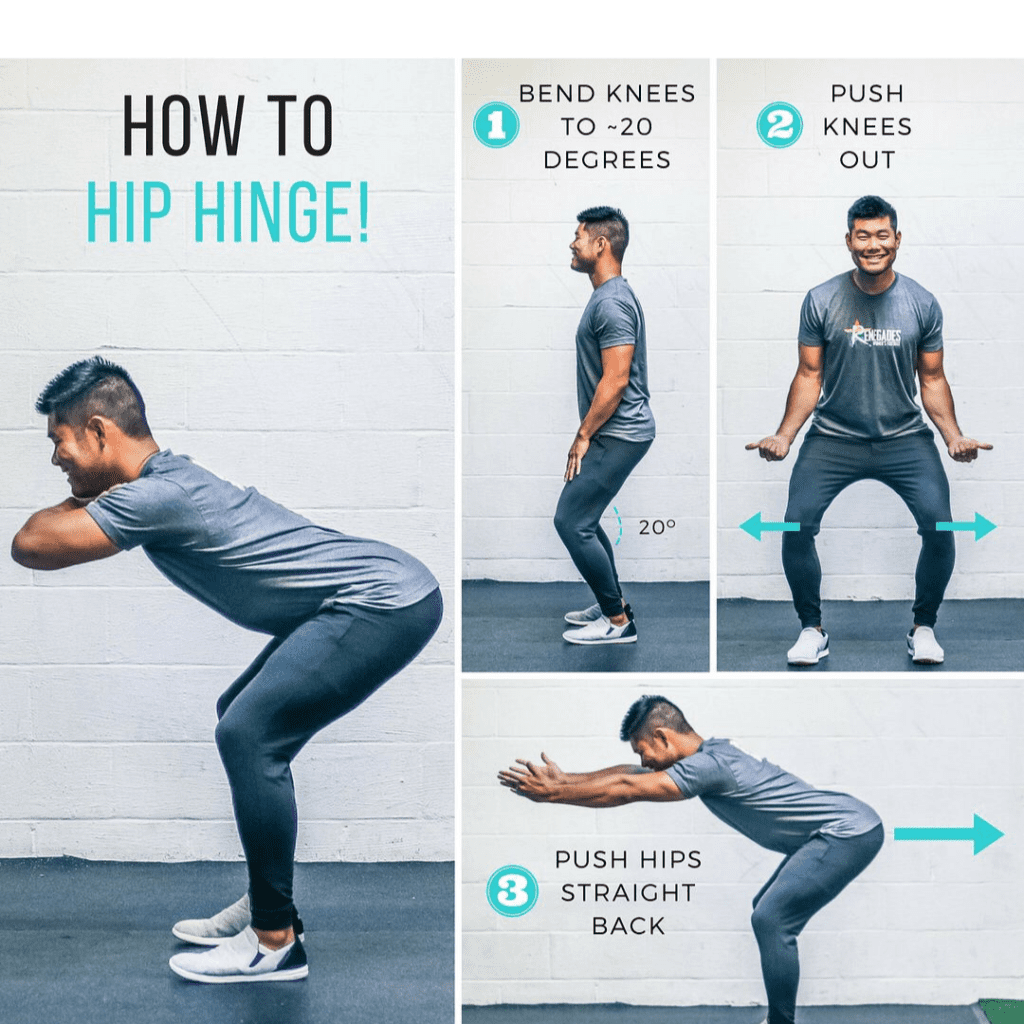
To hip hinge properly you want to keep your spine tall and long and sit back through your hips like you were looking for a chair with your back pockets. This will ensure that your hips and knees bend which will load your gluteus maximus and hamstring muscles. This will ensure that when you go to lift and stand back up that those muscles will be the ones that do the work.
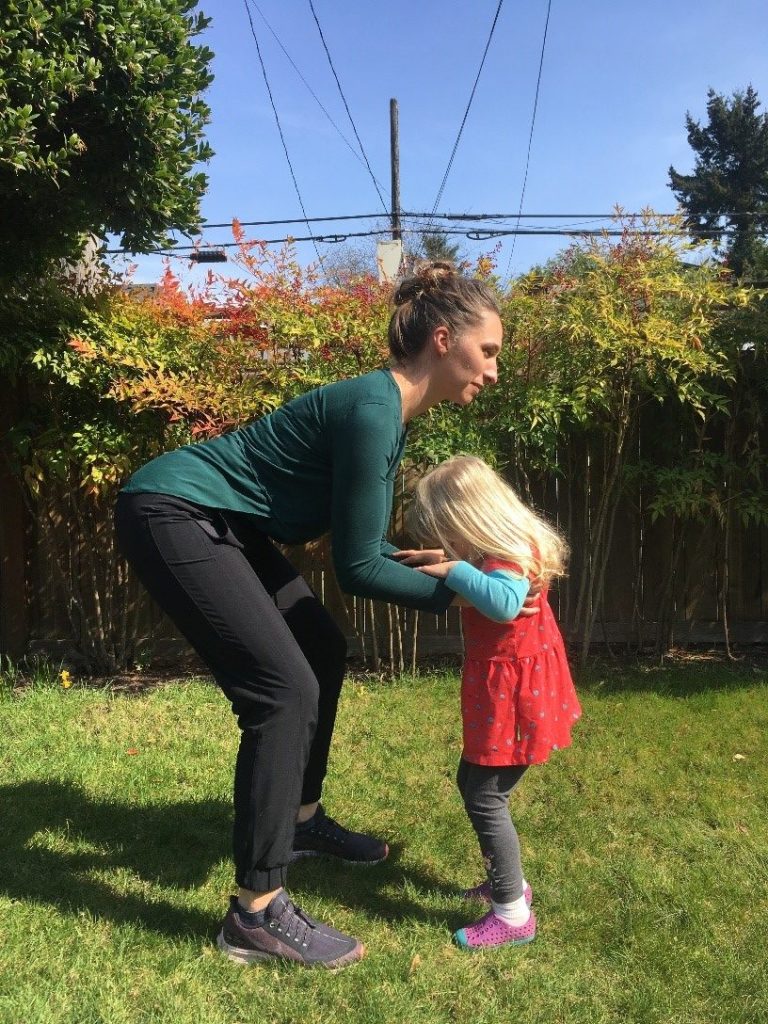
So -- every time you bend down to pick up a child during the holidays, or pick up a heavy gift, or work on some decorations, use the hip hinge in order to spare your spine during the holidays!
A large majority of the low back pain that we suffer from is in some part caused by the discs in our low back. When our discs become irritated, that leads to aching in our low back that can sometimes go down into the back of our hips and thighs. Irritated discs can cause tightness and spasm in the muscles around our low back, and sometimes - if the discs become swollen and bulge - they can press on our nerves and cause pain to run all the way down the legs.
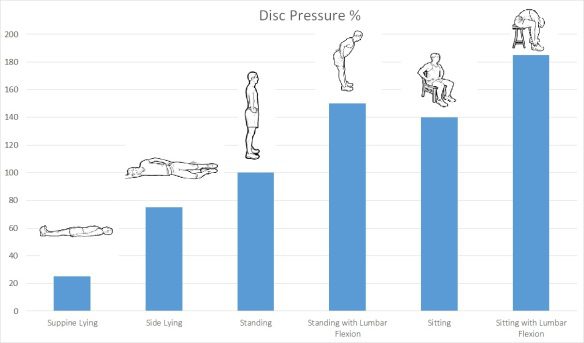
The amount of pressure that our discs experience is influenced by our postures. When we're lying down, our discs experience very low amounts of pressure. When we're standing, that pressure goes up. But the highest amount of pressure that our discs experience is when we sit. So in order to avoid low back pain during the holidays, you will want to try not to sit for long periods of time.
I recommend sitting for no longer than 50 minutes at a time. It's been shown that the frequency of your sitting breaks is more important than how long those breaks are. So set a timer in your phone if you need to and make sure every 50 minutes you stand up for at least 10 seconds.
This will make a huge difference in reducing the irritation to your low back during the holidays!
If you're already dealing with low back pain before the holidays even start, the most important tip is to be proactive. 80% of low back pain is a type of low back pain called flexion intolerant low back pain. This means that our already-injured tissues are irritated when we bend our spine forward.
This is why most of us have pain when we have to bend or lift while our low back is already hurting. But an important fact is that while bending forward will make our low back hurt worse, bending backwards actually helps to reduce the pain and reduce the other symptoms related to the low back pain and including sciatica pain.
So if you're already having pain before the holidays start, you need to do this exercise shown above.
I recommend doing sets of 10 as noted below. Per the video above, you will lie on the floor leaving your hips on the floor, and press your chest up until your elbows are straight. The keys here are to make sure that your butt muscles and your back muscles are relaxed so that your spine bends backwards as much as possible.
If you can do 10 of these every 3 to 4 hours that you're awake during the holidays, you'll find that you will greatly reduce the pain in your spine and lessen the symptoms of sciatica. Below we provide a standing version of this exercise in case it's difficult for you to get down on the floor.
So there you have it. Three tips to help you greatly reduce low back pain during the holidays.
Give them a try to ensure that you won't be left out of any holiday activities this season!
And if you need additional help with pain during the holiday season, make an appointment and come see us here at Movement Laboratory. We offer patient-centered and personally tailored plans that can help you get out of pain quickly and get back to enjoying the holidays of 2021 - and get you started off right into 2022!
Give us a call at 918-300-4084 and say goodbye to pain during the holidays!

Cervical disc bulges can be a very painful condition. However, this condition can resolve very quickly with the proper at-home care. In this post, I'm going to give some tips for at-home care that can help a cervical disc bulge get better very quickly. If you know that you're dealing with a cervical disc bulge, follow these instructions - and you could be pain-free in no time.
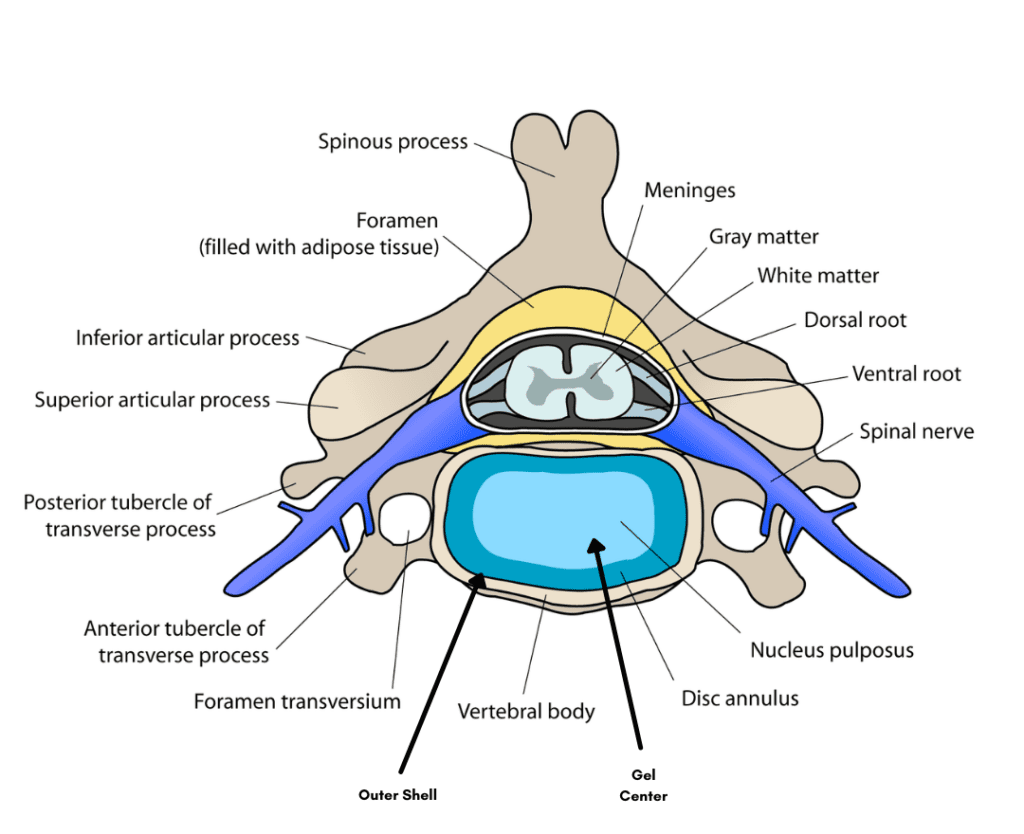
The first part of managing a cervical disc bulge is to understand what's going on. The discs in our spine are similar to a jelly donut. There is a hard outer shell with a gel center. This allows our discs to act as a cushion for the forces that go through our spine; they act as shock absorbers. Without our discs' protection, anytime we fell down, or had a hard bump into something, we would be at risk of compression fractures in our spine. Our discs help to absorb the force of these various blows, and they keep that force from being focused into the bones of our spine.
The structure of the disc actually moves with our spine. The gel and the center of the disc is called the nucleus pulposus. Whenever we bend our spine forward, that gel is pushed to the back of the disc and whenever we bend our spine backwards, the gel moves to the front of the disc.
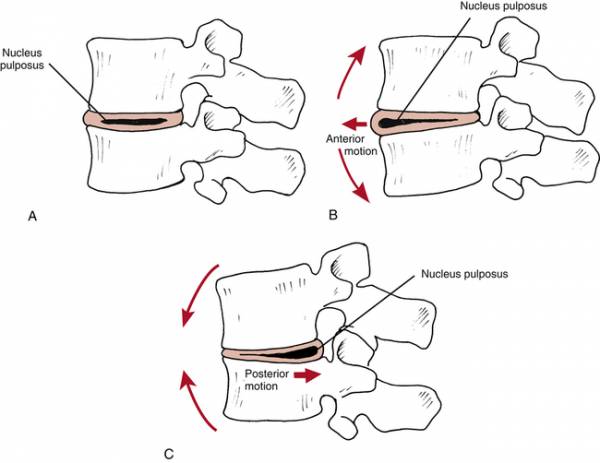
If you think about it for a minute, you can see that most of our daily habits - things like computer usage, usage of cell phones and tablets, reading, and many others - cause our Cervical spine to bend forward. Very few of our common daily habits bend our Cervical spine backwards. Due to this mismatch in movement of our spine, the gel in the center of many of our discs, over time, can start to migrate towards the back of the disc. This eventually starts to put pressure on the outer shell of the disc in the back.
Eventually, this will start to weaken the outer shell and can lead to a bulge in the back of the shell. When this happens in our neck, it's referred to as a cervical disc bulge. This can cause pain and irritation in the neck and tightness in the muscles of the neck.
The other symptom that can be very painful when experiencing a cervical disc bulge is pain in the nerves that go into our arm. When the disc starts to bulge in the back, it can come into contact with the nerves that exit our neck, leading into our arms. This bulging can lead to pain, numbness, tingling, burning, and weakness in the arm.
The proper home care will often allow Cervical Neck Bulges to get better very quickly. Below, I'm listing the best tips for things to do at home that can help you feel better as quickly as possible.
The nerves in our neck react to inflammation differently than the nerves in our low back. The discs in our neck are prone towards excessive inflammation. Scientists have shown in research studies that the nerves in our neck can swell up to twice their normal size when in the presence of inflammation. This can make them twice as likely to get pressed on during a cervical disc bulge.
I often explain disc injuries to my patients as being similar to getting a cut on your knuckle. If you have a cut on your knuckle and you continually bend your finger all day long, the scab gets ripped open multiple times a day - clearly, it will take longer to heal.
A similar effect happens with disc injuries. Since bending our spine forward pushes the gel to the back -- then, every time you bend your spine forward while you have an irritated disc, that bending will cause the disc to become further irritated. This can lead to a constant cycle of pain.
So - when you have a Cervical Disc Bulge, after you've taken actions to STOP the Inflammation, the next tip for you is to limit how often you bend your neck forward (this stops "the scab" from reopening).
This tip alone can be a miracle that helps decrease/eliminate pain during a cervical disc bulge.
Once you quit "picking the scab" each day, you'll notice the pain start to get better very quickly. The next step is to start to move the gel in the disc back to the center.
To do this, we have to use the motion of our spine to accomplish it. As I mentioned above, bending our spine forward too much moves the gel to the back. So in order to move the gel forward to the center, we have to bend our spine backwards often.
To do this, we use an exercise called a chin retraction. In the video above, you'll see this exercise demonstrated. You need to sit up tall and pull your chin backwards like you're giving yourself a double chin. Once you've moved your chin back as far as you can using the muscles of your neck, you will use two fingers on your chin to push your spine backwards even more. If you are having nerve pain going down into the arms, you want to make sure that you use two fingers of the arm that is not painful when you do this exercise.
When you do this action, the gel in the disc gets pushed to the back -- finally, after many years of bending our spine forward more than we've been bending it backwards. So in order to effectively reposition that gel correctly now, we have to bend our spine backwards a lot. At the beginning of a cervical disc bulge, you will want to do 10 of these chin retractions every two hours that you're awake.
The final tip is to get the pressure off the nerves.*
*This tip should only be used if you're having nerve symptoms in one of your arms. When the disc presses on your nerves, it can change the way your nerves move in your arm when you're doing daily tasks.
There are usually three main nerves that can be affected when we have arm pain during a cervical disc bulge. These are the median nerve, the radial nerve, and the ulnar nerve. In order to improve how these nerves move, you would use the exercises shown below.
Each of these three nerves supplies different parts of your arm with sensation.
Note: You would want to do the exercises 1 to 2 times a day and do 10 repetitions each time. These exercises can greatly diminish the symptoms in the arm especially when paired with the chin retractions.
So there you have it! Cervical disc bulges can create a very painful and debilitating condition.
But they can also resolve very quickly if managed correctly. If you know you are dealing with a cervical disc bulge, try these tips and you may likely find that your pain gets better very rapidly!
If you try these tips and are still in pain, your best course of action is to get treatment.
We treat these conditions every day at Movement Laboratory and are very successful at resolving this injury without surgery. Give us a call at 918-300-4084 and schedule an appointment today to let us help you with your cervical disc bulge!
By: John H. Keefe IV, D.C.
We're living in a crazy time right now. Maybe you used to have a solid exercise routine, maybe you haven't been in the gym since Hammerpants were in style. Either way, it's likely the pandemic has gotten in the way of your exercise goals.
Many of us find ourselves wanting to Get Back to our regular exercise routine, or maybe we are just trying to Start an exercise routine for the first time. In both of these situations, it's important to think about scaling our return to exercise.
When you are trying to plan out a return to exercise, I have 3 Main Tips to help you be successful.
1: Start Small
Especially if you used to exercise regularly, this one gets a lot of people. People who used to exercise quite regularly tend to design their workouts for their past selves.
That approach can really sabotage you - as it will usually lead to extreme muscle soreness or even injury. You'll want to give yourself the most opportunity to succeed.
Start small. Set your initial workouts at no more than 45 minutes each and no more than 3 days a week. You don't want to do more than this, so that your body has a chance to acclimate to the new demands.
This leads us to my second point.
2: The 10% Rule
Scientists have studied a lot of athletes of different kinds to see the safest way to increase your workouts. They've looked at runners adding mileage; they've looked at weightlifters increasing their weights; and they also studied other types of athletes who were increasing the difficulty of their workouts.
Whenever you start working out at the gym, your muscles adapt pretty quickly, within a week or two. However, the other soft tissues of the body take longer. Your ligaments and tendons can take 4 to 6 weeks to adapt to increased loads.
Tell yourself to enjoy the process of slowly increasing the capabilities of your body, and forget the quick fixes or fast results. That's not the way our body works. Slow and steady wins the race every time. This takes me to my final tip.
3: Rethink Your Ideas About Cardio
For a long time the general thinking was: If you want to lose weight, you need to do steady-state cardio. Maybe this was running out on the streets, running on a treadmill, doing a stationary bike, etc.
This thinking has been shown to be very untrue. Resistance exercise really has way more benefits than anything that steady-state cardio can offer. If your goal is to get stronger, resistance exercise will get you there. If your goal is to lose weight, high-intensity interval resistance exercise will get you there. If your goal is just maintenance of your abilities, resistance exercise will get you there.
There's nothing wrong if you want to warm up with some running on a treadmill or a stationary bike, but take my advice, and add resistance exercise into your workouts. You'll be glad you did. Some of the benefits include:
So there you have it. These are my recommended steps to make returning to exercise, or starting it for the first time ever, go as smoothly as possible.
So good luck, you got this! And here's to more success in the gym with fewer injuries!