I've gotten a lot of feedback and questions about the feet in the last few weeks after I published my blogs on bunions. This week I wanted to talk about why our feet are so important for our overall health and wellness.
Our feet are literally our foundation.
They are the first thing that contacts the floor once we stand up and become weight-bearing. In addition to housing and maintaining the function of the muscles and joints that exist in our feet, there are also lots of nerves in our feet. Those nerves carry information to our brain and spinal cord that informs our brains about the structures of the environment around us.
If we are walking uphill, the nerves in the feet sense the stretch in the bottom of the feet from the hill and they begin to turn on the muscles that we use to raise our leg as we walk up the hill. If we are on uneven terrain, the nerves in the feet send messages to the brain and spinal cord that activate the stabilizing muscles in our hips that help to support us on uneven surfaces.
This is part of what makes the feet so important. As they encounter the ground around us, our feet send messages that help the rest of our body prepare for the environment that we are in. This is one of the reasons for the minimalist and barefoot trend emerging over the last 5 to 10 years. Much of our common footwear these days does not allow our feet to flex and bend and splay with the changes in our terrain. That limits the information coming in from the feet and makes our ankle, hip, and core muscles less able to anticipate the needs of the body.
Tightness in the feet and ankles can also limit this information. That is why foot and ankle mobility is so important. If your foot and ankle cannot bend and twist and splay, then those messages never get to the brain and spinal cord.
So this means there are two needs that our foot and ankle have to properly get our body ready to move.
In this blog, I will discuss how to make sure your foot and ankle get good exposure to the environment.
In my next blog, I will be going over how to make sure your foot and ankle have proper mobility.
The best way to make sure that your foot is able to sense the ground and the environment around you is to make sure that your footwear allows this to occur. This is why I recommend minimalist shoes for most feet.
When Minimalist shoes first came out, cushioning was thought to be bad, no matter what. And in my opinion, this is what caused many people to dislike minimalist shoes. Let's face it: If you are a marathon runner -- you're going to need some cushion. Thankfully, now minimalist shoes come with a wide range of features.
My recommendations for good Minimalist shoes for everyday use are the New Balance Minimus line, the Merrell vapor gloves, and splay shoes. These are really good shoes for going to work, working out, or walking or hiking. The links to find these shoes are below.
If you're looking for good Minimalist shoes for endurance sports like running, trail running, or long distance walking, I recommend Altra shoes and Topos. These are great foot-shaped shoes with no build-up in the heel and with good cushioning. The links to these shoes are below.
These shoes are a great first step to getting the most out of your foundation.
Additionally - and actually very importantly: I also recommend just walking barefoot in the grass as often as you can. Wake those feet up! Your body will thank you!
And remember, you can always check with me here at Movement Laboratory about any of your foot questions ---we're here at 918.300.4084 or dr.john@movlabtulsa.com.
Be sure to watch for my next blog about ensuring MOBILITY of your feet. It's a critical issue - and there are things you can do to increase your ability to move well on your feet!

We've all heard that old song as kids: "The foot bone's connected to the ankle bone." But what we may not know is that that song is actually very true. Our feet can affect our entire body. A great example of this is a research study that found that hyper-pronation of the foot can lead to TMJ pain in the jaw.
In this blog, I'm going to cover three of the main conditions I find on a regular basis when my patients have pain in other areas of the body - but it's actually being caused by issues with their feet and ankles.
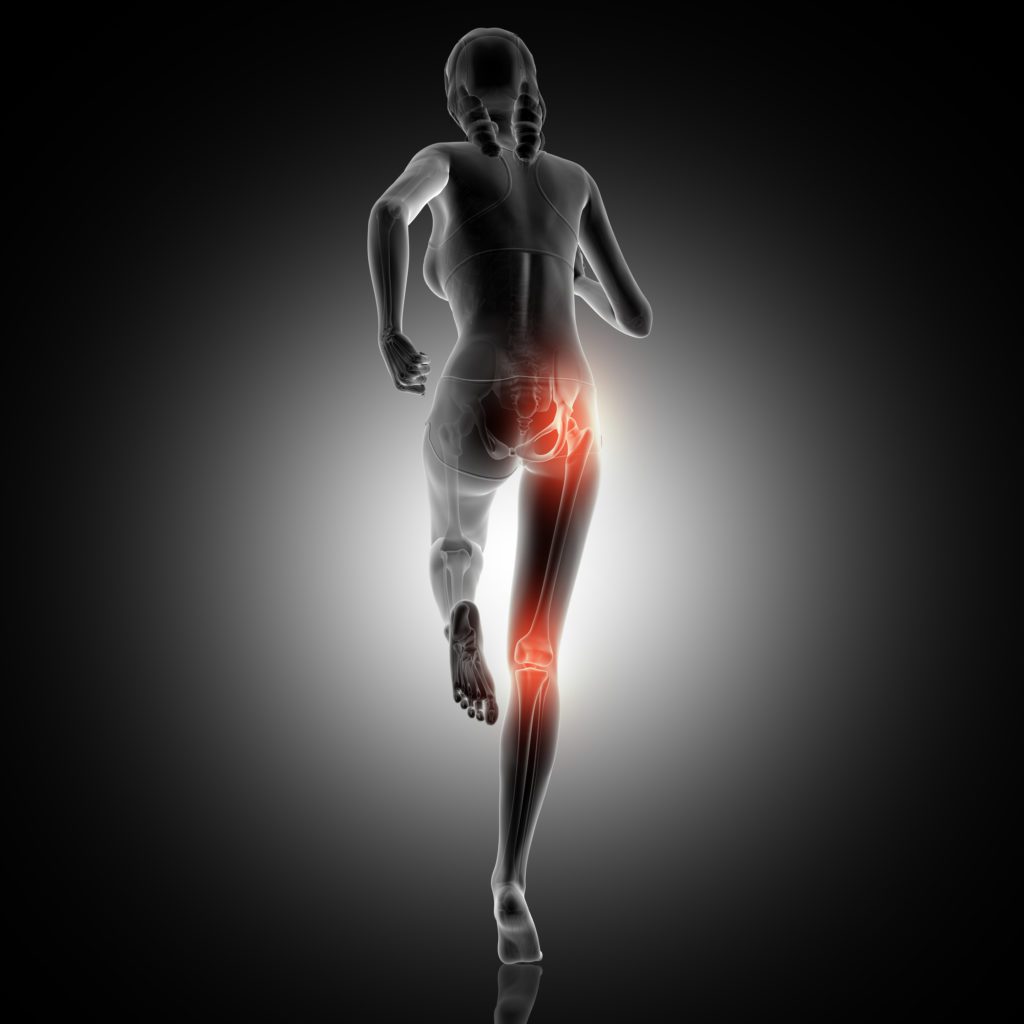
At first glance, the knee appears to be a pretty simple joint; it looks like it's a simple hinge. But looks can be deceiving. The knee not only bends like a hinge, but it also rotates inward and outward and can translate forward and backwards.
There's a saying in the healthcare world, "The knee is a slave to the hip and ankle". A great way to see this for yourself is to stand up and try to move your knee without moving your hips or ankles. It's impossible!
If you have an unstable foot with either too much pronation or supination, this will put your knee in a vulnerable position. An over-pronated foot will cause increased stress on your inner knee and an over- supinated foot will cause increased stress on the outer knee.
Stiffness in your foot and ankle leads to pain in the front of the knee and around the kneecap. This is one of the most common types of knee pain that I see in my practice. Pain around the kneecap is often accompanied with both stiffness in your ankle and instability in the foot, so that condition needs a proper assessment by a healthcare practitioner to facilitate the quickest healing.
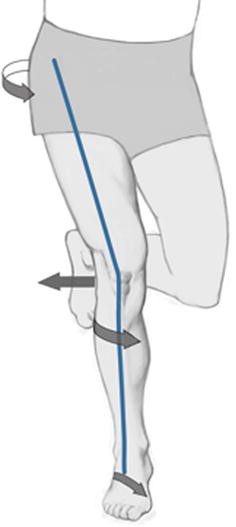
The hips can also be impacted by issues in the feet. Instability in the foot and ankle can lead to pain on the outer hip and posterior hip, and can also lead to pain in the groin. Stiffness in the ankle most commonly can lead to pain in the front of the hip.
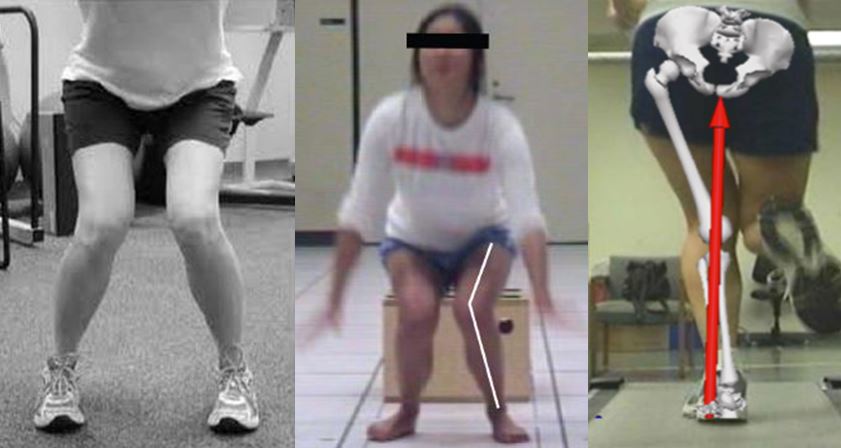
When the foot over-pronates, it causes the knee to "cave in" - this leads to increased stress in the outer hip muscles (the gluteus medius) and increased stress in the back of the hip in the piriformis muscle.
When we have a stiff ankle, it causes a change in the final stage of the gait cycle called "toe-off". When we step forward, our weight is supposed to shift forward while our ankle flexes; this allows our leg to push us forward. When the ankle is stiff, that can lead to excess force needed in our hip in order to step forward. That situation will cause pain in the anterior or posterior hip.
The feet and ankles can also be a primary component of low back pain. Anytime we utilize squatting motions, such as sitting in a chair, squatting down to pick something up, or jumping, our ankles need to bend.
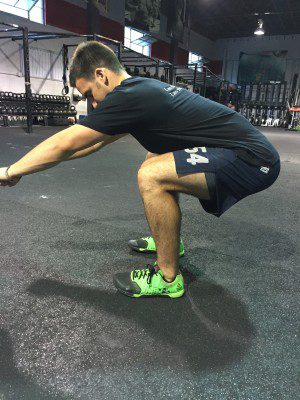
When our ankles are stiff, in order to get our hips lowered such as to allow us to sit in a chair, we have to bend our back more than is necessary to accomplish that task. So stiffness in the ankles will cause increased stress and pain in the low back.
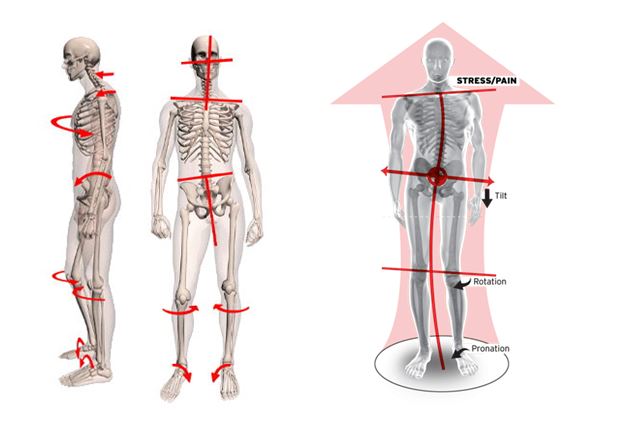
Instability in the feet and ankles will also cause a rotation in our pelvis. When our pelvis is not able to be in a neutral position for long periods of time, this causes increased stress in the muscles and ligaments of the low back. In this case, this causes under-pronation or over-supination, either of which can also be a contributor to low back pain.
The most important thing to understand in considering how instability, over-pronation, or over-supination, and other feet/ankle conditions can affect areas like the knee, hips, low back - or even the jaw - is that we may only feel pain and discomfort in the other areas. This means we may not realize that our feet and ankles are the problem because we don't feel any pain there.
This is why it's important to see a healthcare practitioner who evaluates the entire body - not just the area that is hurting. At Movement Laboratory, every new patient gets a full-body movement assessment; no matter if the complaint they're coming in for is neck pain, knee pain, or wrist pain, or another area. It's critical to check how each area's mobility range and level affects the rest of the body.
A proper comprehensive evaluation will save a ton of time in recovery. So - if you're dealing with any of the issues listed in this blog, come see us at Movement Laboratory to get feeling better as fast as possible! Just give us a call at 918-300-4084 or you can even book online at movlab.janeapp.com.
In today's world, we've pretty much learned that a functional core is vital to how our body performs. Many of the aches and pains that are common can be linked to an improperly functioning core. But what you may not know is that proper posture is a big player in how well your core functions.
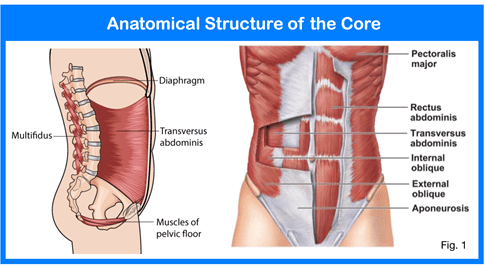
Our core is functionally a cylinder. It has cylindrical walls and a roof and a floor. The walls of our core are the deep abdominal muscles in the front and sides and our spinal muscles in the back. The roof of the core is our diaphragm. The floor of the core is our pelvic floor muscles. The picture above illustrates this.
In order for the core to function properly, the walls, roof, and floor must all be aligned properly. The purpose of our core is to do two things: Our core attaches the top part of our body to the lower part, and it creates something called intra-abdominal pressure.
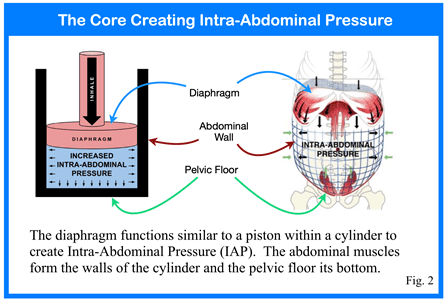
Intra-abdominal pressure is vital for proper core function. To picture what intra-abdominal pressure does, you need to imagine blowing up a balloon as much as you possibly can. Then imagine grabbing the balloon from the top and the bottom and trying to twist it or fold it over on itself.
If it's completely full of air, this will be difficult. But imagine you let a little bit of air out. Now it's easier to twist and bend that balloon.
The same concept applies to the core. When we have good intra-abdominal pressure, it helps to stabilize our spine and make it hard to bend and twist. This is important when we're lifting heavy things to help keep our spine safe. When we don't create intra-abdominal pressure well, our spine is vulnerable.
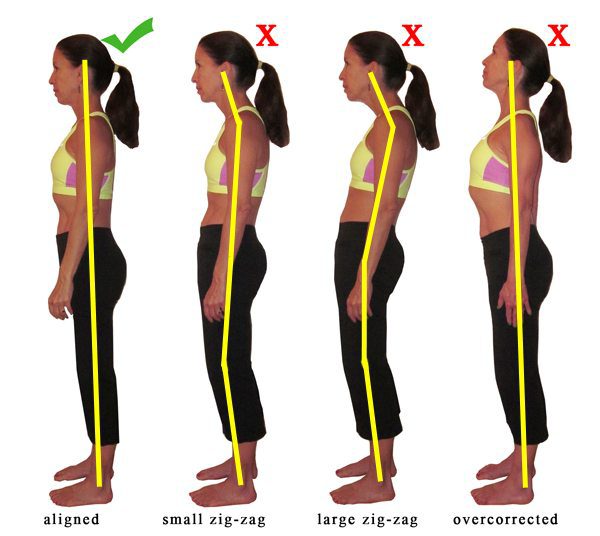
The roof has to be stacked directly over the floor. In regards to posture, this means that your diaphragm needs to be stacked directly over your pelvic floor. Your diaphragm is attached to your rib cage and your pelvic floor is attached to your pelvis. So, if your rib cage or pelvic posture is not ideal, then you are at a disadvantage for creating intra-abdominal pressure.
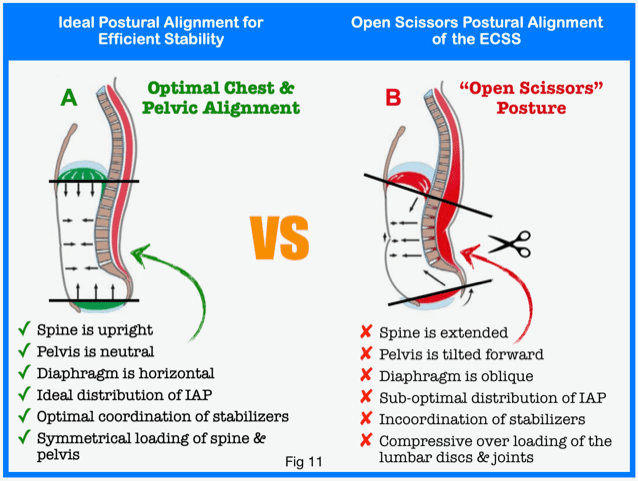
Many people have what's referred to as "open-scissors posture." This is when we have a little bit of an excessive arch in our low back that causes our rib cage to be tilted backwards and our pelvis to be tilted forwards. This creates really bad alignment and hinders the creation of intra-abdominal pressure. The picture above shows the open-scissors posture.
The video below shows the proper postural alignment and how to put your body in the best position to enable your core to function.
The exercises below are great to help make those postural corrections permanent. Remember to start these exercises with proper alignment.
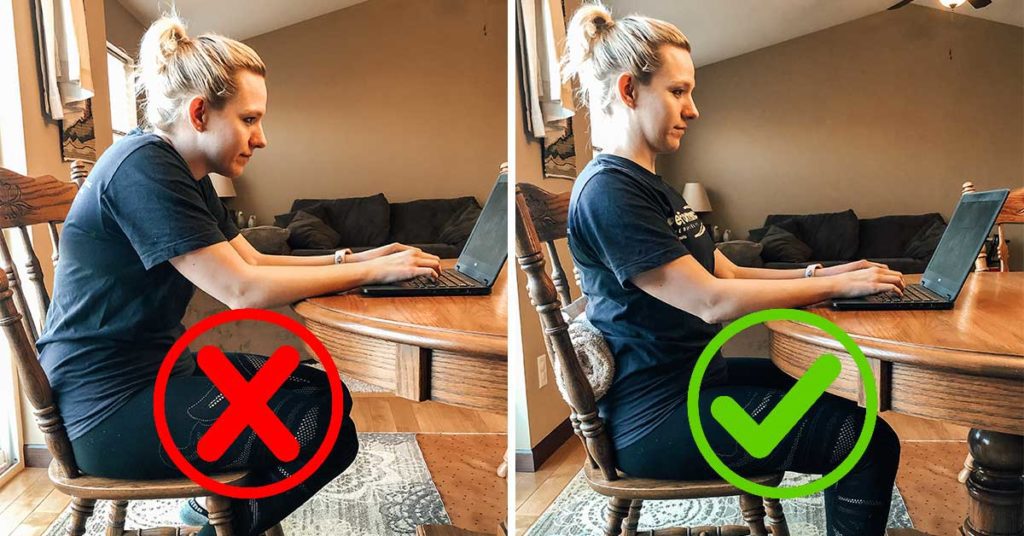
It's easy to see how your Posture affects your Core!
And there you have it. Now you have some great tips for how to align your body to get better core function. If you are reading this blog because you have pain related to poor core function, we can help! Just come see us at Movement Laboratory to experience the MovLab Difference!
Using Chiropractic care and specific therapeutic exercises, we get people out of pain and back to what they love FAST! Call us at 918-300-4084 to schedule your appointment today.
When your low back is hurting, sitting can be a rough proposition. This is because sitting puts a lot of pressure on your low back. Sitting incorrectly can make work or other tasks that require long periods of sitting a very painful experience. In this blog, I want to introduce some simple tips to greatly reduce your pain from sitting.
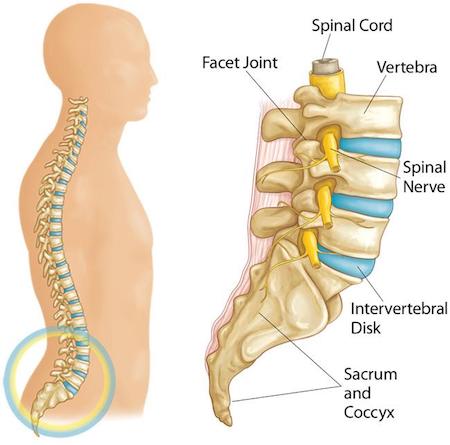
The bottom of your pelvis has two thickened pieces of bone that are designed to support your weight. These are called the ischial tuberosities or more commonly referred to as our "sit bones". The picture below shows these bones.

The problem is many of us don't actually sit on our sit bones: Instead, we sit on our tailbones. Doing that puts a lot of pressure on our low back and can be a big contributor to pain when sitting and after sitting. When you slouch while sitting, you're shifting the weight off of your sit bones and back to your tailbone.
If you have low back pain when sitting, pay attention to that! Make sure to rearrange yourself. Sit up tall and find that neutral sitting position that makes you feel like your weight is resting on your sit bones. The picture below shows the right way to sit and the wrong way.
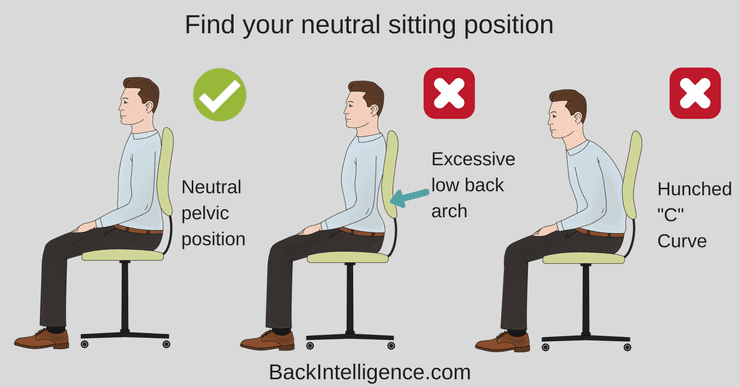
In order to find this important neutral position, sit in your chair, slouch and let your pelvis roll backwards, then roll your pelvis the opposite way by excessively arching your back. These are the two extremes. Then find the middle point between these two positions and that is your neutral. Sitting in neutral will greatly reduce low back pain.
The discs in your low back are under different amounts of pressure throughout the day. Some positions put minimal amounts of pressure on your discs and some put a lot of pressure on your discs.
We all have to sit at some point in our lives. Some jobs require a lot of sitting. We can't avoid sitting. But we can break it up.
Research has found that taking breaks from sitting can reduce pain from sitting. That same research has found that it's the quantity of breaks that makes the most difference - not the length of the breaks. So its better to take a 10-second break every hour than to take a 30-minute break every three hours.
I recommend taking a break every 50 minutes. This break can be 10 seconds or 5 minutes.
The bones of your low back have three joints with every bone above and below them.
When your low back is leaned forward, such as when you slouch, the weight is shifted forward so that your disc joints bear most of the load.
When your low back is hurting, putting most of the weight on your discs is not a good idea.
When you instead have a backwards curve in your low back, the weight is shifted backwards towards the facet joints. Creating that backwards curve as you sit can greatly reduce the pain in your low back. The picture below shows these joints.
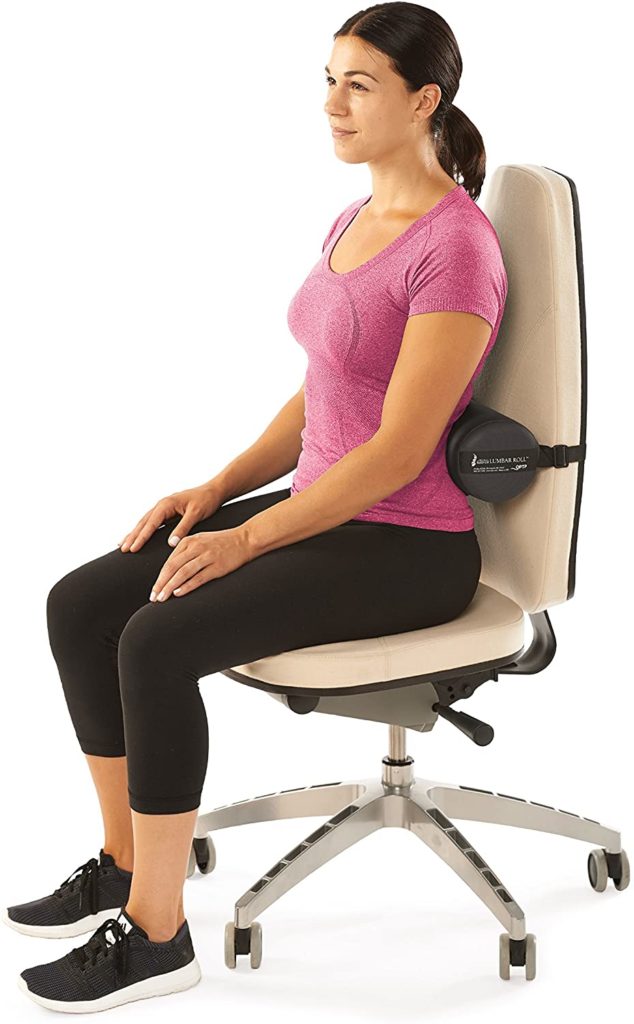
Lumbar supports are devices used to help shift the weight more towards the facet joints so the discs are not bearing all the weight. If sitting upright and taking sitting breaks still leaves you with lots of low back pain when sitting, then you need to try adding a lumbar support.
I recommend what's called a lumbar roll. The picture below shows one of these devices. The device can be strapped to any seat, so you can take it with you from your work chair to your car and to your couch at home. The picture below shows a lumbar roll.
You want to make sure you place it correctly for it to be most effective. The video below shows how to position it on your back to get the best results.
If posture correction and breaks are not enough for you, try a lumbar roll. Make sure you use it every time you sit for 3-4 weeks and you should notice a significant decrease in your low back pain when sitting.
So there you have it. 3 simple tips that will make a big difference in your low back pain when sitting.
If you want some help to make that back pain a thing of the past, come see me at Movement Laboratory at 92nd & Sheridan. Most of our low back pain patients get 80-100% improvement in their pain in just 3 weeks!
If that sounds good to you, give us a call at 918-300-4084.
Lifting ... It's the most common cause of low back injury. And low back pain is the most common cause of disability in the United States. So it's really important that you lift correctly!
There are lots of sayings like, "Lift with your knees, not with your back," - and they are mostly right. But the one that I like the most is the title of this blog! "Lift with your butt, not with your back."
Did you know that your butt muscle, the gluteus maximus, is the largest muscle in your body?! It was made, in part, for lifting heavy things. In contrast, your low back muscles are actually pretty small in comparison. Clearly, our bodies were designed to lift heavy things using our butts.
In this blog, I'm going to go over 3 tips to make sure you're lifting with your butt and not your back.
The general rule of thumb in lifting is this:
Whatever body part you bend to get down to pick up the weight is used to lift it up.
So the key to sparing your spine when you're lifting is to just not bend it in the first place.
There are three basic movement patterns that we use to lift things from the floor, whether in daily life or at the gym. These movement patterns are the squat, the lunge, and the hip hinge.
Doing these movements correctly involves maintaining a neutral spine. While the hips and knees bend, the spine stays neutral and tall. Below, you will find videos demonstrating the proper body alignment when doing these three movements.
The main muscle groups that we want to use when we're bending and lifting are on the back side of the body. In order to load these muscles and make sure that they are the dominant ones used when lifting something heavy, you have to make sure that your body does what's called a posterior weight shift.
This means that your center of gravity shifts backwards in order to stretch the muscles on the back side of the body so that they can then be used to lift whatever you're lifting.
To do this, you want to make sure that you feel the weight of your body in your heels and not up at the balls of your feet. Watch the video below to find out how to get your weight in your heels.
Many of us over-rely on our back muscles when lifting. At the top of a lifting motion, you want to feel a strong abdominal contraction and butt muscle contraction. This means your hips are doing the lifting. If you bend over to lift something, and as you raise back up, you feel a strong contraction in your low back muscles, this means you are not using your hips.
You want to focus on using the hip muscles to do the lifting. The video below shows how to do this.
So there you have it. We will all be lifting presents, kids, decorations, etc. in the next few weeks. If you want to make it through without hurting your low back:
"Lift with your butt - not with your back!"
If you read this too late and you are already hurting, give us a call at Movement Laboratory at 918-300-4084. Schedule an appointment today to get out of pain fast!

The holidays can be an amazing time. We often get to see family, we make time to get together with others and share our lives, and we get to share gifts with those we love. However, the holidays can also be a difficult time when we're in pain. If pain prevents us from participating in the holiday festivities, that can make us feel distant from those around us.
It's a tough thing to not be able to join in with the family and share those holiday activities. Low back pain is often one of the most common issues that people deal with during the holidays, and it can prevent us from being able to jump right in and share in the making of memories.
This season may require a lot of work. There's putting up those lights and decorating the front of the house, decorating the inside of the house, preparing the meal, wrapping gifts, and many other manual tasks. They can provide a lot of strain to the low back. If you were already in pain, this additional activity can flare up that situation. But also, even if you were not in pain before, the work of getting ready for the holidays can make your low back hurt all by itself. But don't lose hope! I'm going to share three awesome tips with you to help you avoid low back pain during this holiday season.
Getting ready for the holidays can require lots of bending and lifting. Whether it's setting up the decorations, getting food prepared and arranged, or picking up those precious grandchildren, many of us wind up doing a bunch of bending and lifting that we may not be accustomed to doing.
Bending and lifting is a known cause of low back pain if done incorrectly. So in order to get through your holidays without a low-back flare-up, you want to pay close attention to your form when bending or lifting.
The largest muscle in our bodies is the gluteus maximus. These are your butt muscles. Right next to those muscles are your hamstrings. These are also big strong muscles. When you bend and lift anything, take care to ensure that you are relying mostly on your glutes and hamstrings to lift -- and not your back muscles.
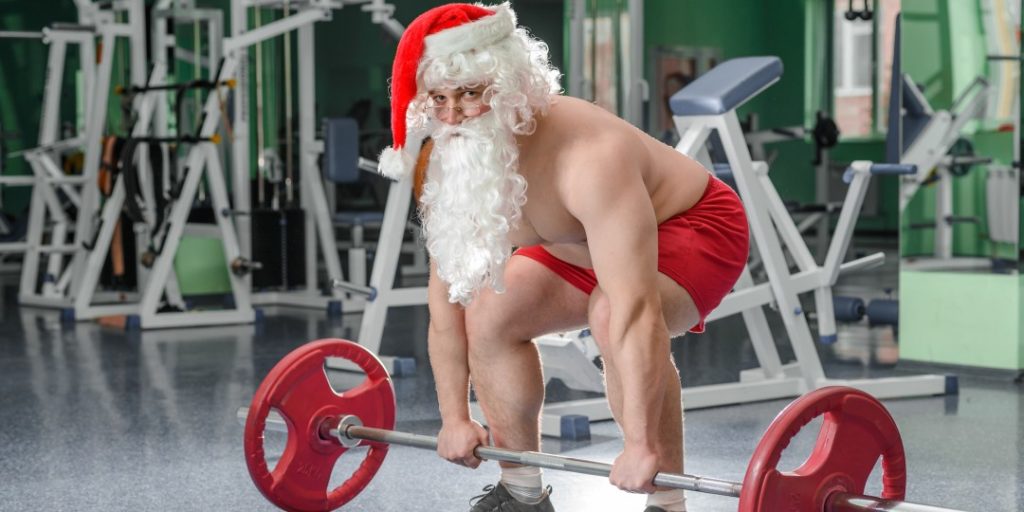
In order to set these muscles up to do the work when bending or lifting, you have to pay attention to your posture. When you bend down to lift something up, if you bend your spine too much, you have to use the muscles in your spine in order to come back up from the bend. So instead of bending with your spine to lift something up - take care to instead bend with your hips and knees. This motion is called a hip hinge.
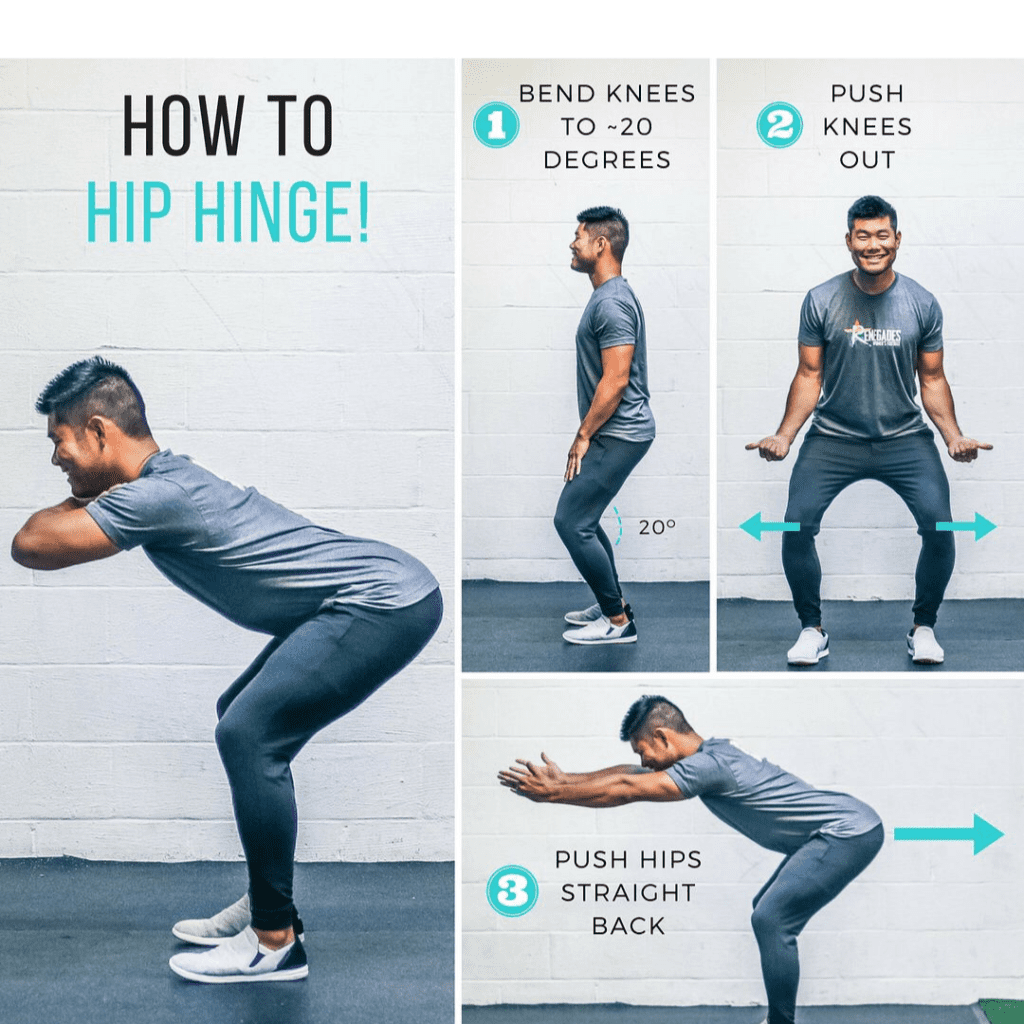
To hip hinge properly you want to keep your spine tall and long and sit back through your hips like you were looking for a chair with your back pockets. This will ensure that your hips and knees bend which will load your gluteus maximus and hamstring muscles. This will ensure that when you go to lift and stand back up that those muscles will be the ones that do the work.
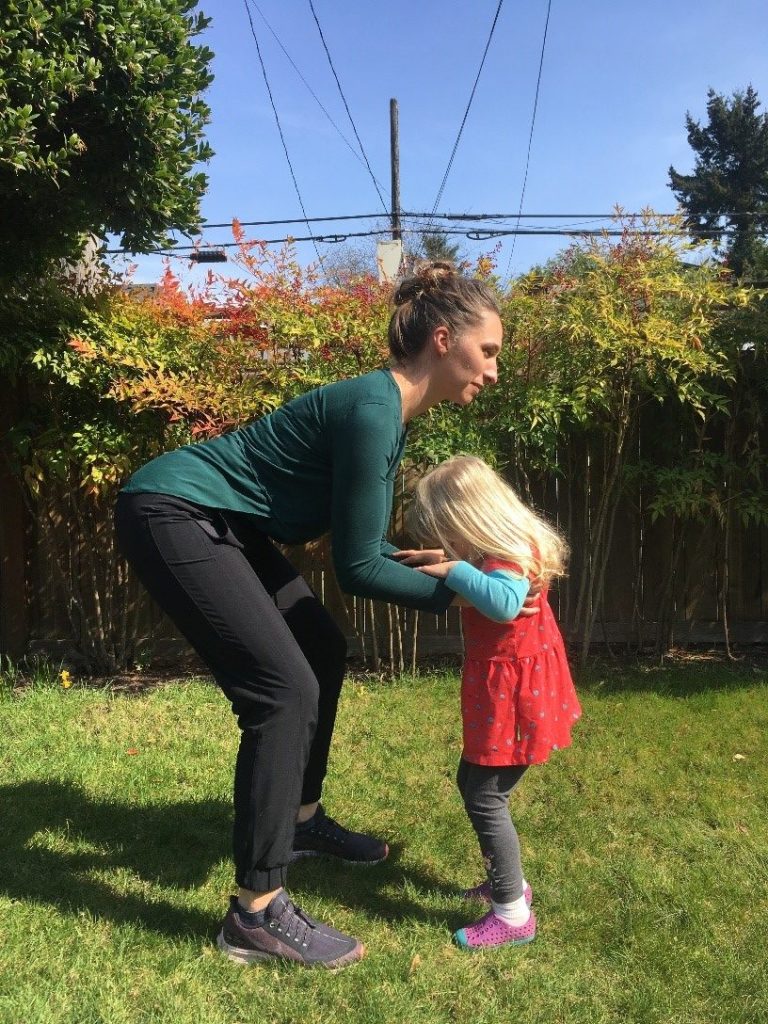
So -- every time you bend down to pick up a child during the holidays, or pick up a heavy gift, or work on some decorations, use the hip hinge in order to spare your spine during the holidays!
A large majority of the low back pain that we suffer from is in some part caused by the discs in our low back. When our discs become irritated, that leads to aching in our low back that can sometimes go down into the back of our hips and thighs. Irritated discs can cause tightness and spasm in the muscles around our low back, and sometimes - if the discs become swollen and bulge - they can press on our nerves and cause pain to run all the way down the legs.
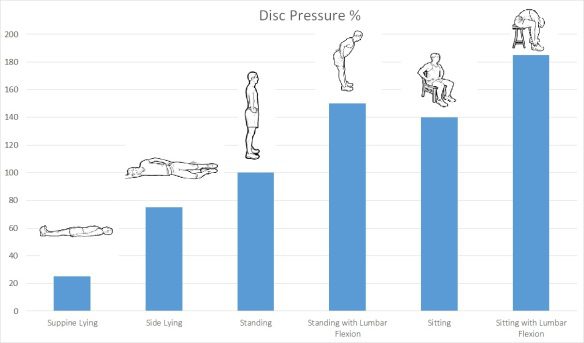
The amount of pressure that our discs experience is influenced by our postures. When we're lying down, our discs experience very low amounts of pressure. When we're standing, that pressure goes up. But the highest amount of pressure that our discs experience is when we sit. So in order to avoid low back pain during the holidays, you will want to try not to sit for long periods of time.
I recommend sitting for no longer than 50 minutes at a time. It's been shown that the frequency of your sitting breaks is more important than how long those breaks are. So set a timer in your phone if you need to and make sure every 50 minutes you stand up for at least 10 seconds.
This will make a huge difference in reducing the irritation to your low back during the holidays!
If you're already dealing with low back pain before the holidays even start, the most important tip is to be proactive. 80% of low back pain is a type of low back pain called flexion intolerant low back pain. This means that our already-injured tissues are irritated when we bend our spine forward.
This is why most of us have pain when we have to bend or lift while our low back is already hurting. But an important fact is that while bending forward will make our low back hurt worse, bending backwards actually helps to reduce the pain and reduce the other symptoms related to the low back pain and including sciatica pain.
So if you're already having pain before the holidays start, you need to do this exercise shown above.
I recommend doing sets of 10 as noted below. Per the video above, you will lie on the floor leaving your hips on the floor, and press your chest up until your elbows are straight. The keys here are to make sure that your butt muscles and your back muscles are relaxed so that your spine bends backwards as much as possible.
If you can do 10 of these every 3 to 4 hours that you're awake during the holidays, you'll find that you will greatly reduce the pain in your spine and lessen the symptoms of sciatica. Below we provide a standing version of this exercise in case it's difficult for you to get down on the floor.
So there you have it. Three tips to help you greatly reduce low back pain during the holidays.
Give them a try to ensure that you won't be left out of any holiday activities this season!
And if you need additional help with pain during the holiday season, make an appointment and come see us here at Movement Laboratory. We offer patient-centered and personally tailored plans that can help you get out of pain quickly and get back to enjoying the holidays of 2021 - and get you started off right into 2022!
Give us a call at 918-300-4084 and say goodbye to pain during the holidays!

Cervical disc bulges can be a very painful condition. However, this condition can resolve very quickly with the proper at-home care. In this post, I'm going to give some tips for at-home care that can help a cervical disc bulge get better very quickly. If you know that you're dealing with a cervical disc bulge, follow these instructions - and you could be pain-free in no time.
The first part of managing a cervical disc bulge is to understand what's going on. The discs in our spine are similar to a jelly donut. There is a hard outer shell with a gel center. This allows our discs to act as a cushion for the forces that go through our spine; they act as shock absorbers. Without our discs' protection, anytime we fell down, or had a hard bump into something, we would be at risk of compression fractures in our spine. Our discs help to absorb the force of these various blows, and they keep that force from being focused into the bones of our spine.
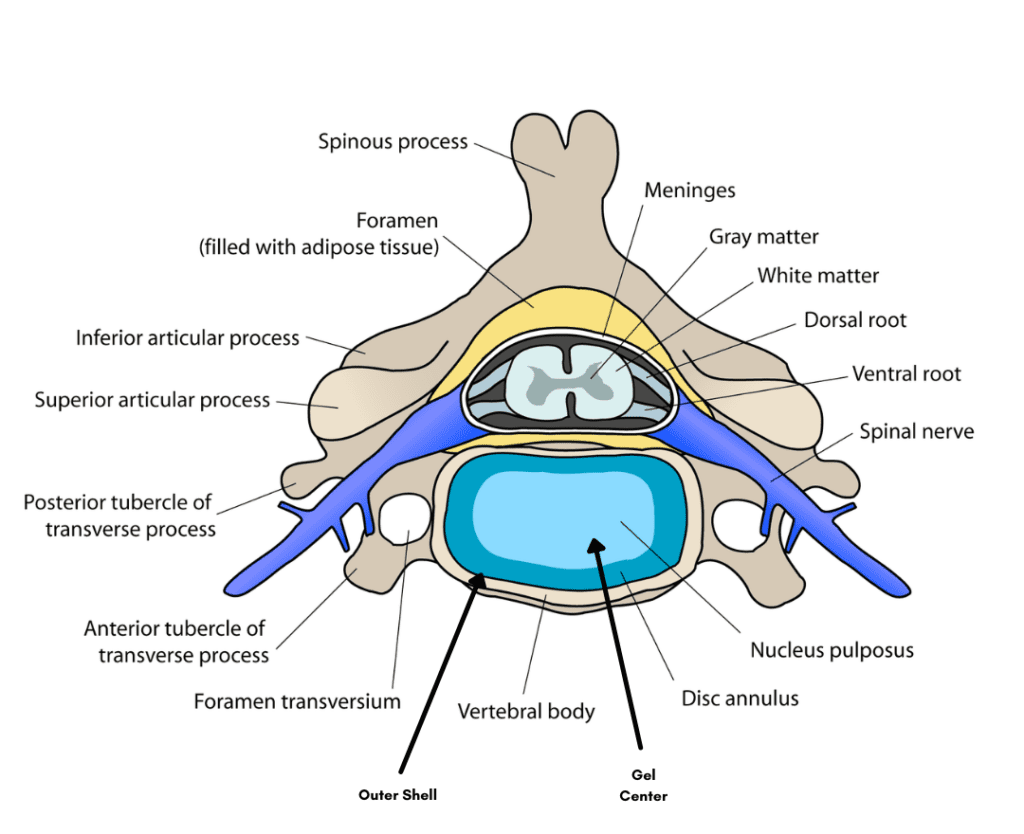
The structure of the disc actually moves with our spine. The gel and the center of the disc is called the nucleus pulposus. Whenever we bend our spine forward, that gel is pushed to the back of the disc and whenever we bend our spine backwards, the gel moves to the front of the disc.
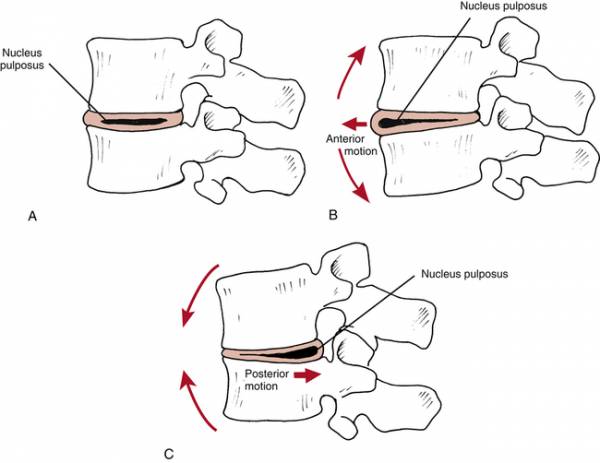
If you think about it for a minute, you can see that most of our daily habits - things like computer usage, usage of cell phones and tablets, reading, and many others - cause our Cervical spine to bend forward. Very few of our common daily habits bend our Cervical spine backwards. Due to this mismatch in movement of our spine, the gel in the center of many of our discs, over time, can start to migrate towards the back of the disc. This eventually starts to put pressure on the outer shell of the disc in the back.
Eventually, this will start to weaken the outer shell and can lead to a bulge in the back of the shell. When this happens in our neck, it's referred to as a cervical disc bulge. This can cause pain and irritation in the neck and tightness in the muscles of the neck.
The other symptom that can be very painful when experiencing a cervical disc bulge is pain in the nerves that go into our arm. When the disc starts to bulge in the back, it can come into contact with the nerves that exit our neck, leading into our arms. This bulging can lead to pain, numbness, tingling, burning, and weakness in the arm.
The proper home care will often allow Cervical Neck Bulges to get better very quickly. Below, I'm listing the best tips for things to do at home that can help you feel better as quickly as possible.
The nerves in our neck react to inflammation differently than the nerves in our low back. The discs in our neck are prone towards excessive inflammation. Scientists have shown in research studies that the nerves in our neck can swell up to twice their normal size when in the presence of inflammation. This can make them twice as likely to get pressed on during a cervical disc bulge.
I often explain disc injuries to my patients as being similar to getting a cut on your knuckle. If you have a cut on your knuckle and you continually bend your finger all day long, the scab gets ripped open multiple times a day - clearly, it will take longer to heal.
A similar effect happens with disc injuries. Since bending our spine forward pushes the gel to the back -- then, every time you bend your spine forward while you have an irritated disc, that bending will cause the disc to become further irritated. This can lead to a constant cycle of pain.
So - when you have a Cervical Disc Bulge, after you've taken actions to STOP the Inflammation, the next tip for you is to limit how often you bend your neck forward (this stops "the scab" from reopening).
This tip alone can be a miracle that helps decrease/eliminate pain during a cervical disc bulge.
Once you quit "picking the scab" each day, you'll notice the pain start to get better very quickly. The next step is to start to move the gel in the disc back to the center.
To do this, we have to use the motion of our spine to accomplish it. As I mentioned above, bending our spine forward too much moves the gel to the back. So in order to move the gel forward to the center, we have to bend our spine backwards often.
To do this, we use an exercise called a chin retraction. In the video above, you'll see this exercise demonstrated. You need to sit up tall and pull your chin backwards like you're giving yourself a double chin. Once you've moved your chin back as far as you can using the muscles of your neck, you will use two fingers on your chin to push your spine backwards even more. If you are having nerve pain going down into the arms, you want to make sure that you use two fingers of the arm that is not painful when you do this exercise.
When you do this action, the gel in the disc gets pushed to the back -- finally, after many years of bending our spine forward more than we've been bending it backwards. So in order to effectively reposition that gel correctly now, we have to bend our spine backwards a lot. At the beginning of a cervical disc bulge, you will want to do 10 of these chin retractions every two hours that you're awake.
The final tip is to get the pressure off the nerves.*
*This tip should only be used if you're having nerve symptoms in one of your arms. When the disc presses on your nerves, it can change the way your nerves move in your arm when you're doing daily tasks.
There are usually three main nerves that can be affected when we have arm pain during a cervical disc bulge. These are the median nerve, the radial nerve, and the ulnar nerve. In order to improve how these nerves move, you would use the exercises shown below.
Each of these three nerves supplies different parts of your arm with sensation.
Note: You would want to do the exercises 1 to 2 times a day and do 10 repetitions each time. These exercises can greatly diminish the symptoms in the arm especially when paired with the chin retractions.
So there you have it! Cervical disc bulges can create a very painful and debilitating condition.
But they can also resolve very quickly if managed correctly. If you know you are dealing with a cervical disc bulge, try these tips and you may likely find that your pain gets better very rapidly!
If you try these tips and are still in pain, your best course of action is to get treatment.
We treat these conditions every day at Movement Laboratory and are very successful at resolving this injury without surgery. Give us a call at 918-300-4084 and schedule an appointment today to let us help you with your cervical disc bulge!
By: John H. Keefe IV, D.C.
The Neck Assessment is part of my new blog series, titled ----"Check Yourself Before You Wreck Yourself". In this series, I will be teaching mobility self-assessments and corrective exercise stretches. You will learn how to check the function of different areas of your body. If you find a problem, I will teach you step-by-step how to improve the movement in these areas.
Today I want to demonstrate three self-assessments for the neck. Those are:
The first self-assessment/test - for Neck Flexion - is shown in the video above. The goal of this assessment is to be able to touch your chin to your chest without separating your teeth (opening your jaw) in order to accomplish that.
This is a test that many people will not be able to do. Many of us, due to sitting and working on computers or looking at our other technology, become tight in areas that restrict this motion.
An inability to pass this test means that you are at increased risk for neck pain in general. You're possibly also prone to getting tension headaches, migraines, and jaw pain. If you're unable to pass this test, try the corrections listed below.
The first correction is shown in the video above. It requires the use of a "peanut" which is made by simply taping either two tennis balls or two lacrosse balls together.
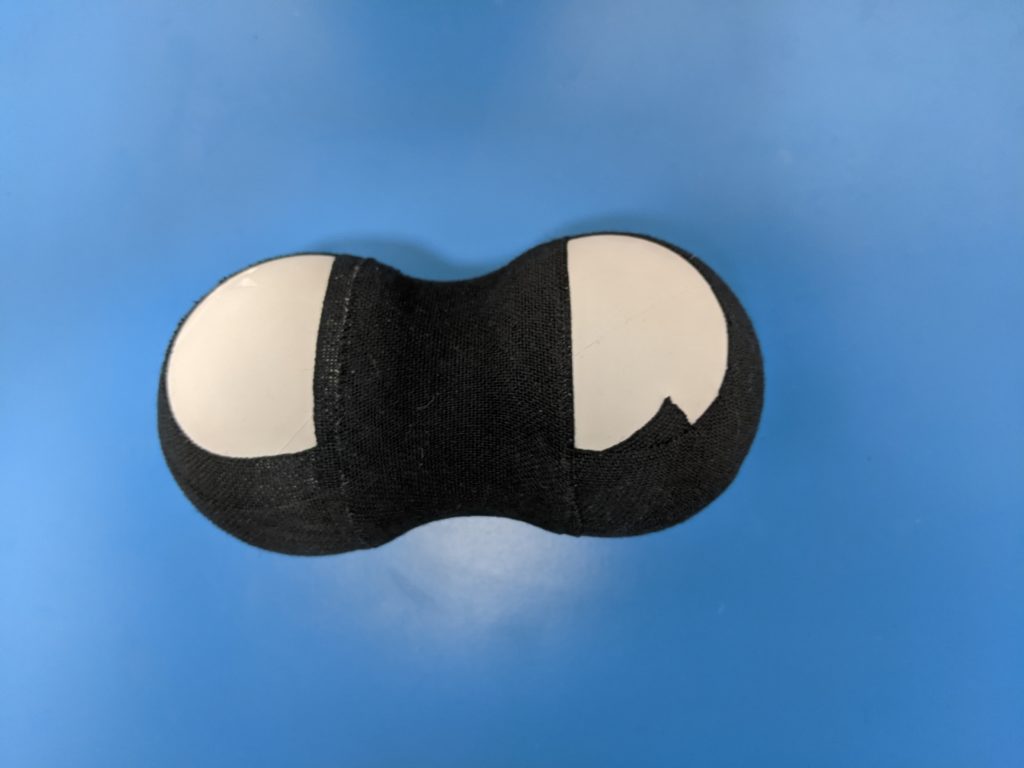
There are two main muscle groups we want to target to help improve the Neck Flexion range of motion. The first are the muscles at the base of your skull.
Once you have finished this corrective action, repeat the test. You'll notice that you'll be able to bring your chin down closer to your chest.
Doing this once may not immediately enable you to pass this test, but if you work at it for just a week or two, you will likely be able to pass the test.
The second self assessment looks at your ability to rotate your head from side to side. For this test, you're going to slowly turn your nose one direction as far as you can. Once you get as far as you can, try to bring your chin downwards to touch your collarbone. To pass this test, you should be able to touch your chin to about the middle of your collarbone on each side.
The muscles that restrict this movement are very commonly indicated in general neck tightness, neck pain, and tightness due to stress. If you're unable to pass this test, try the corrections below.
Once you finish this stretch, repeat the self-assessment. Like I said with the first self-assessment, doing this once may not immediately enable you to pass the test - but if you work on these stretches for at least 2 weeks, you should see great improvement on this test!
So there it is. That's my first entry for this new blog series entitled "Check Yourself Before You Wreck Yourself!" Make sure you stay tuned to future blogs for the next part in this series. The things you'll learn will allow you to take control of how your body moves and help you to eliminate pain yourself!
SPECIAL OFFER!
"Check Yourself Before You Wreck Yourself" Course - Available here on my Website under "Courses" Tab
In collaboration with Zac King, I have an extended online course of the same name for anyone who is interested. This course has many self-assessments for the rest of the body and self-corrections to help improve any areas that are problematic. We're offering a special promotion for anyone who would like to sign up for the course and get $10 off! --- That makes the Entire Course only $29.99!
Get signed up today if you want to take control of your movement and eliminate pain on your own! Click the following link to sign up today: https://movlabtulsa.com/courses/
And don't forget - if you run into any issues, or if your neck isn't responding as you wish, MovLab is here to help at any point in your neck rehab work - Mobility is our specialty! Just call us at 918.300.4084 to schedule your next appointment - you'll be glad you did!
Many of you have experienced the following situation.
Maybe your neck wasn't hurting at all - or maybe it hurt just a little bit, ... and then you lay down to go to sleep. But - when you woke up, your neck was stiff and sore and definitely worse than when you went to bed.
If this has happened to you, you need to read this article. These tips could make a big difference!
Sleeping should not make your neck pain worse or create neck pain if your neck wasn't hurting before.
The point here is that if you wake up from sleeping, and you have neck pain that you didn't have before, then there's something wrong with the way that you're sleeping.
In this article I'm going to give you the top three tips that will help you to eliminate neck pain when you sleep.
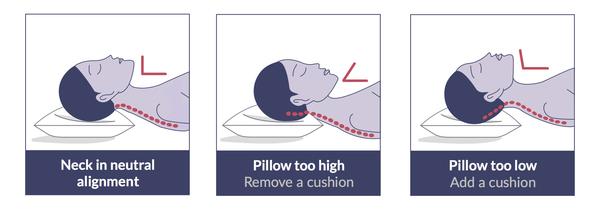
The most common reason for neck pain while sleeping is not having the right pillow for you. When we sleep, we want our neck to be in what's called a neutral position. In this position, our neck is mostly straight, but has a slight backwards curve.
Your sleeping position plays a big role in determining what is the right pillow is for you.
Stomach-sleeping is never recommended, and especially not if you have neck pain. T
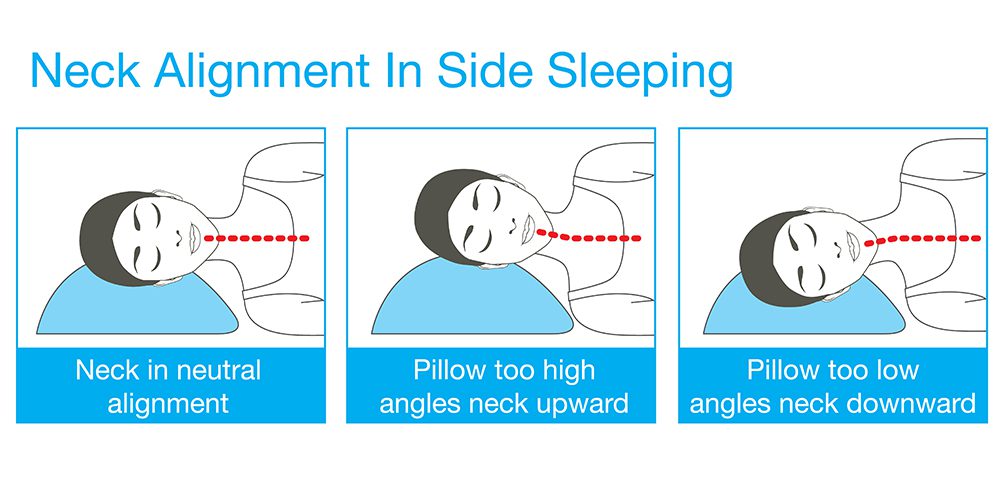
The distance between your mattress and your head is much smaller when you're laying on your back then when you're laying on your side. This means that you need a much-thicker pillow when you're lying on your side than when you're lying on your back.
Most side sleepers use pillows that are too small for them. This doesn't mean you need to go out and buy a brand new pillow. Many times, you can just add a skinnier pillow or even some folded-up towels underneath your existing pillow in order to maintain that neutral neck position.
Once you have found the pillow that is the right size for you, you then need to make sure that the rest of your body is in proper alignment. The area of the body that is most important in relationship to neck pain is our shoulder blades.
The most common issue I see that can contribute to neck pain is elevated shoulder blades. This means that the distance between your shoulder blades and your ears is smaller than it should be. This shortens the muscles of our neck and shoulders and causes them to feel tight and painful the next morning.
Once you are lying in a good, neutral position with your head on the pillow, your next step should be to consciously lower your shoulder blades downward and keep them there. The video above shows how to do this.
When you do this before you go to sleep, and you do it again any time you wake up in the night, you will greatly reduce the tightness and pain in your neck the following morning.
So - at this point, you've found the right pillow for you, you've got your shoulders and the proper alignment, and the last important checkpoint before you go to sleep is the position of your head.
Many of us sleep with our head extended. This causes our chin to jut out far away from our throat. In this position, the muscles at the base of our skull are put in a very shortened position. This can cause these muscles to contract, tighten up and be very sore in the morning.
Not only can this cause pain in the neck, but these muscles are highly connected to headaches. If you find you are waking up with headaches in the morning, this is a "must- fix" for you!
Watch the video below, and I will show you how to fix this.
You're on your way to better sleep and better neck mobility and strength in the morning!
There you have it.
You're all set to develop a new sleeping practice that will give your neck a break - and help you wake up refreshed and with your neck muscles relaxed and ready for a great day!
These three tips will greatly reduce any pain that you have in your neck after sleeping. If you try these tips and you're still having neck pain, I recommend you visit a healthcare practitioner for a proper examination and treatment plan.
If you live in the Tulsa area, Movement Laboratory is here to help resolve any neck pain that these three tips don't take care of. Give us a call at 918-300-4084 and schedule your appointment today!
*We have a "Giving Thanks" new-patient special we're offering for the month of November that gives you $85 off your new patient visit - you'll receive my Assessment and your first treatment for just $65 patient cost!
Don't wait - you can call to schedule today!
I often have patients who come to see me for neck pain. I will do some manual therapy on their neck muscles and adjust some of the joints in their neck -- and they walk out feeling amazing! Then I'll see them a few days later -- and their neck has tightened back up again.
Patients often ask me, "Why is my neck always tight?" I tell them that one of the major contributors to chronic neck pain and tightness is poor breathing mechanics. At this point, they normally look at me like I have two heads. They may say, "Well, I'm alive -- so how can I be breathing wrong?"
In this blog, I'm going to cover how poor breathing mechanics contribute to neck pain and what to do to fix it. (add in a separator line here to note the Blog beginning)
The Body's Ability to Adapt - Good AND Bad
Our bodies are pretty amazing. One thing that makes our body so amazing is its ability to adapt. Without this ability, when we sprained our ankles, we would be confined to a wheelchair. Instead--our body figures out a way to walk without putting weight on our injured ankle - what we would call a limp.
But sometimes this ability to adapt can lead to problems. Imagine if you sprained your ankle when you were 12 -- and your body decided to limp for the rest of your life. Eventually, the changes your body made to not put weight on your injured ankle would start to overload the other areas of your body and possibly lead to pain and injury.
The same thing can happen when we change our breathing mechanics. The primary muscle that's supposed to be used for breathing is the diaphragm. The diaphragm sits at the bottom of our rib cage and is shaped like an upside-down bowl. When the diaphragm contracts, it drops down and creates negative pressure in the chest. That makes us suck air in through our mouth and nose and fills our lungs with precious oxygen.
Even though the diaphragm is our body's primary muscle for breathing, we also have lots of other muscles that are called secondary (or accessory) muscles of breathing. These muscles are supposed to be called upon only in times of great oxygen demand. After vigorous exercise, these secondary muscles help to increase the amount of oxygen coming into the lungs to help us recover from the exertion.
Problems occur when people start to use these secondary muscles of breathing all the time. These muscles are only designed to assist in breathing occasionally, and are not to be used 24/7 while we breathe in and out all day long. These muscles are much smaller than the diaphragm and can fatigue much more easily than the diaphragm.
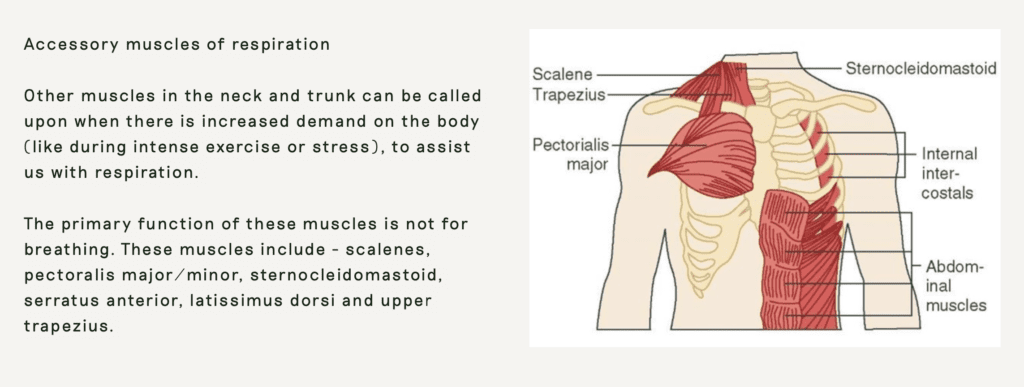
If you look at the picture above, you'll see that it shows these secondary muscles of breathing. Many of them are around our chest and neck. Breathing mechanics that overuse these muscles can lead to tightness and soreness in these areas. The average human breathes 20,000 times a day. So if you use these muscles to breathe all the time, they get a 20,000 rep workout every day. Imagine what your biceps would feel like if you did 20,000 bicep curls every day! They'd probably be pretty sore and tight.
When we primarily use our secondary muscles of breathing, that's called a chest-breathing pattern. Instead of using the diaphragm to drop down and create negative pressure in the chest, we elevate our rib cage to create that negative pressure in the chest. This pattern not only leads to the tightness that I was talking about; it is also a less-efficient breathing pattern that leads to less oxygen entering our lungs.
Why do Most of us Breathe from our Chest, Not our Diaphragm?
So why does this happen in the first place? There are a lot of answers for this.
For many of us, one big reason is simply our culture. When we breathe with our diaphragm, the diaphragm drops down and creates that negative pressure in the lungs -- but what it also does is that it increases the pressure in our belly -- which makes our belly expand.
If you think of every article you've ever read about losing weight, how to dress attractively, or every depiction of an attractive person in our media, you'll be quickly able to note that an expanded belly is never a part of any of those messages about how to look great. From a very young age, we have modeled for us that we must always suck in our bellies -- to appear skinny. This is a very strong cultural message, and in my opinion, is one of the primary underlying reasons for these chest-breathing strategies.
What can we do to change this Breathing Pattern and Start Using our Diaphragm to Breathe?
So now that we know what the problem is, how do we fix it?
FIND Your Diaphragm
The first thing we have to do is get in touch with our diaphragm muscle. Let me give you a great exercise that will help you do just that.
After learning how to feel your diaphragm, you want to go right into learning how to use it to breathe.
Use Your Diaphragm to BREATHE
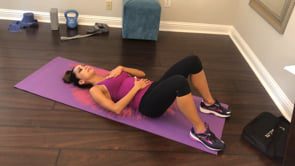
Lying on your back is the easiest position to use as you first start to practice proper breathing mechanics; that's because it allows most of your muscles to relax since you're not having to resist gravity. But that's not usually a position that we're in much of our day -- so it's important that we also learn to do this same type of breathing in other positions.
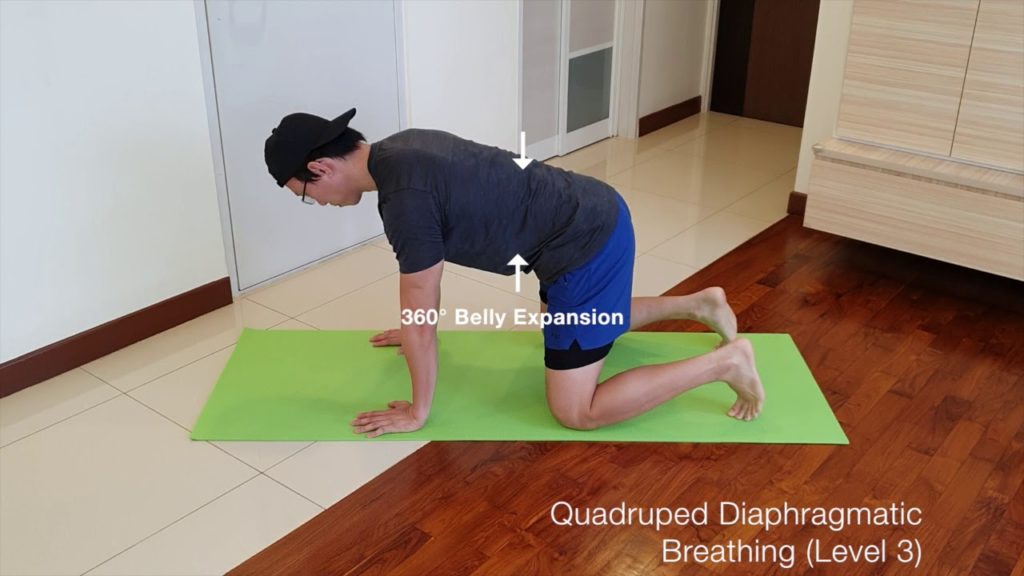
If you take the time to work on each of these exercises for two to three weeks, and then move on to the next one listed, I promise you that you'll begin to notice less tension in your neck and chest.
Why not spend 3-10 minutes a day doing this Breathwork to give your neck and chest muscles a new possibility of Relaxing while your diaphragm does the work it was designed to do? You won't regret it!
If you need more help with your neck pain or any other pain, Movement Laboratory is here to help! Give us a call at 918-300-4084 and schedule your appointment today. During the month of November, we are having a special for a free exam on your New Patient visit. That's an $85 value! Don't let pain interfere with your Holidays, come see us today!